Contents
This user guide (7700-05-0210 rev 3) covers the Instech Model 400 Syringe Infusion Pump for Research (part no. P400) running the latest firmware:
UI: 1.3.0
System: 1.3.0
To upgrade your firmware, see Maintenance below.
Getting Started
Operation
Maintenance
Safety
Troubleshooting
Getting Started
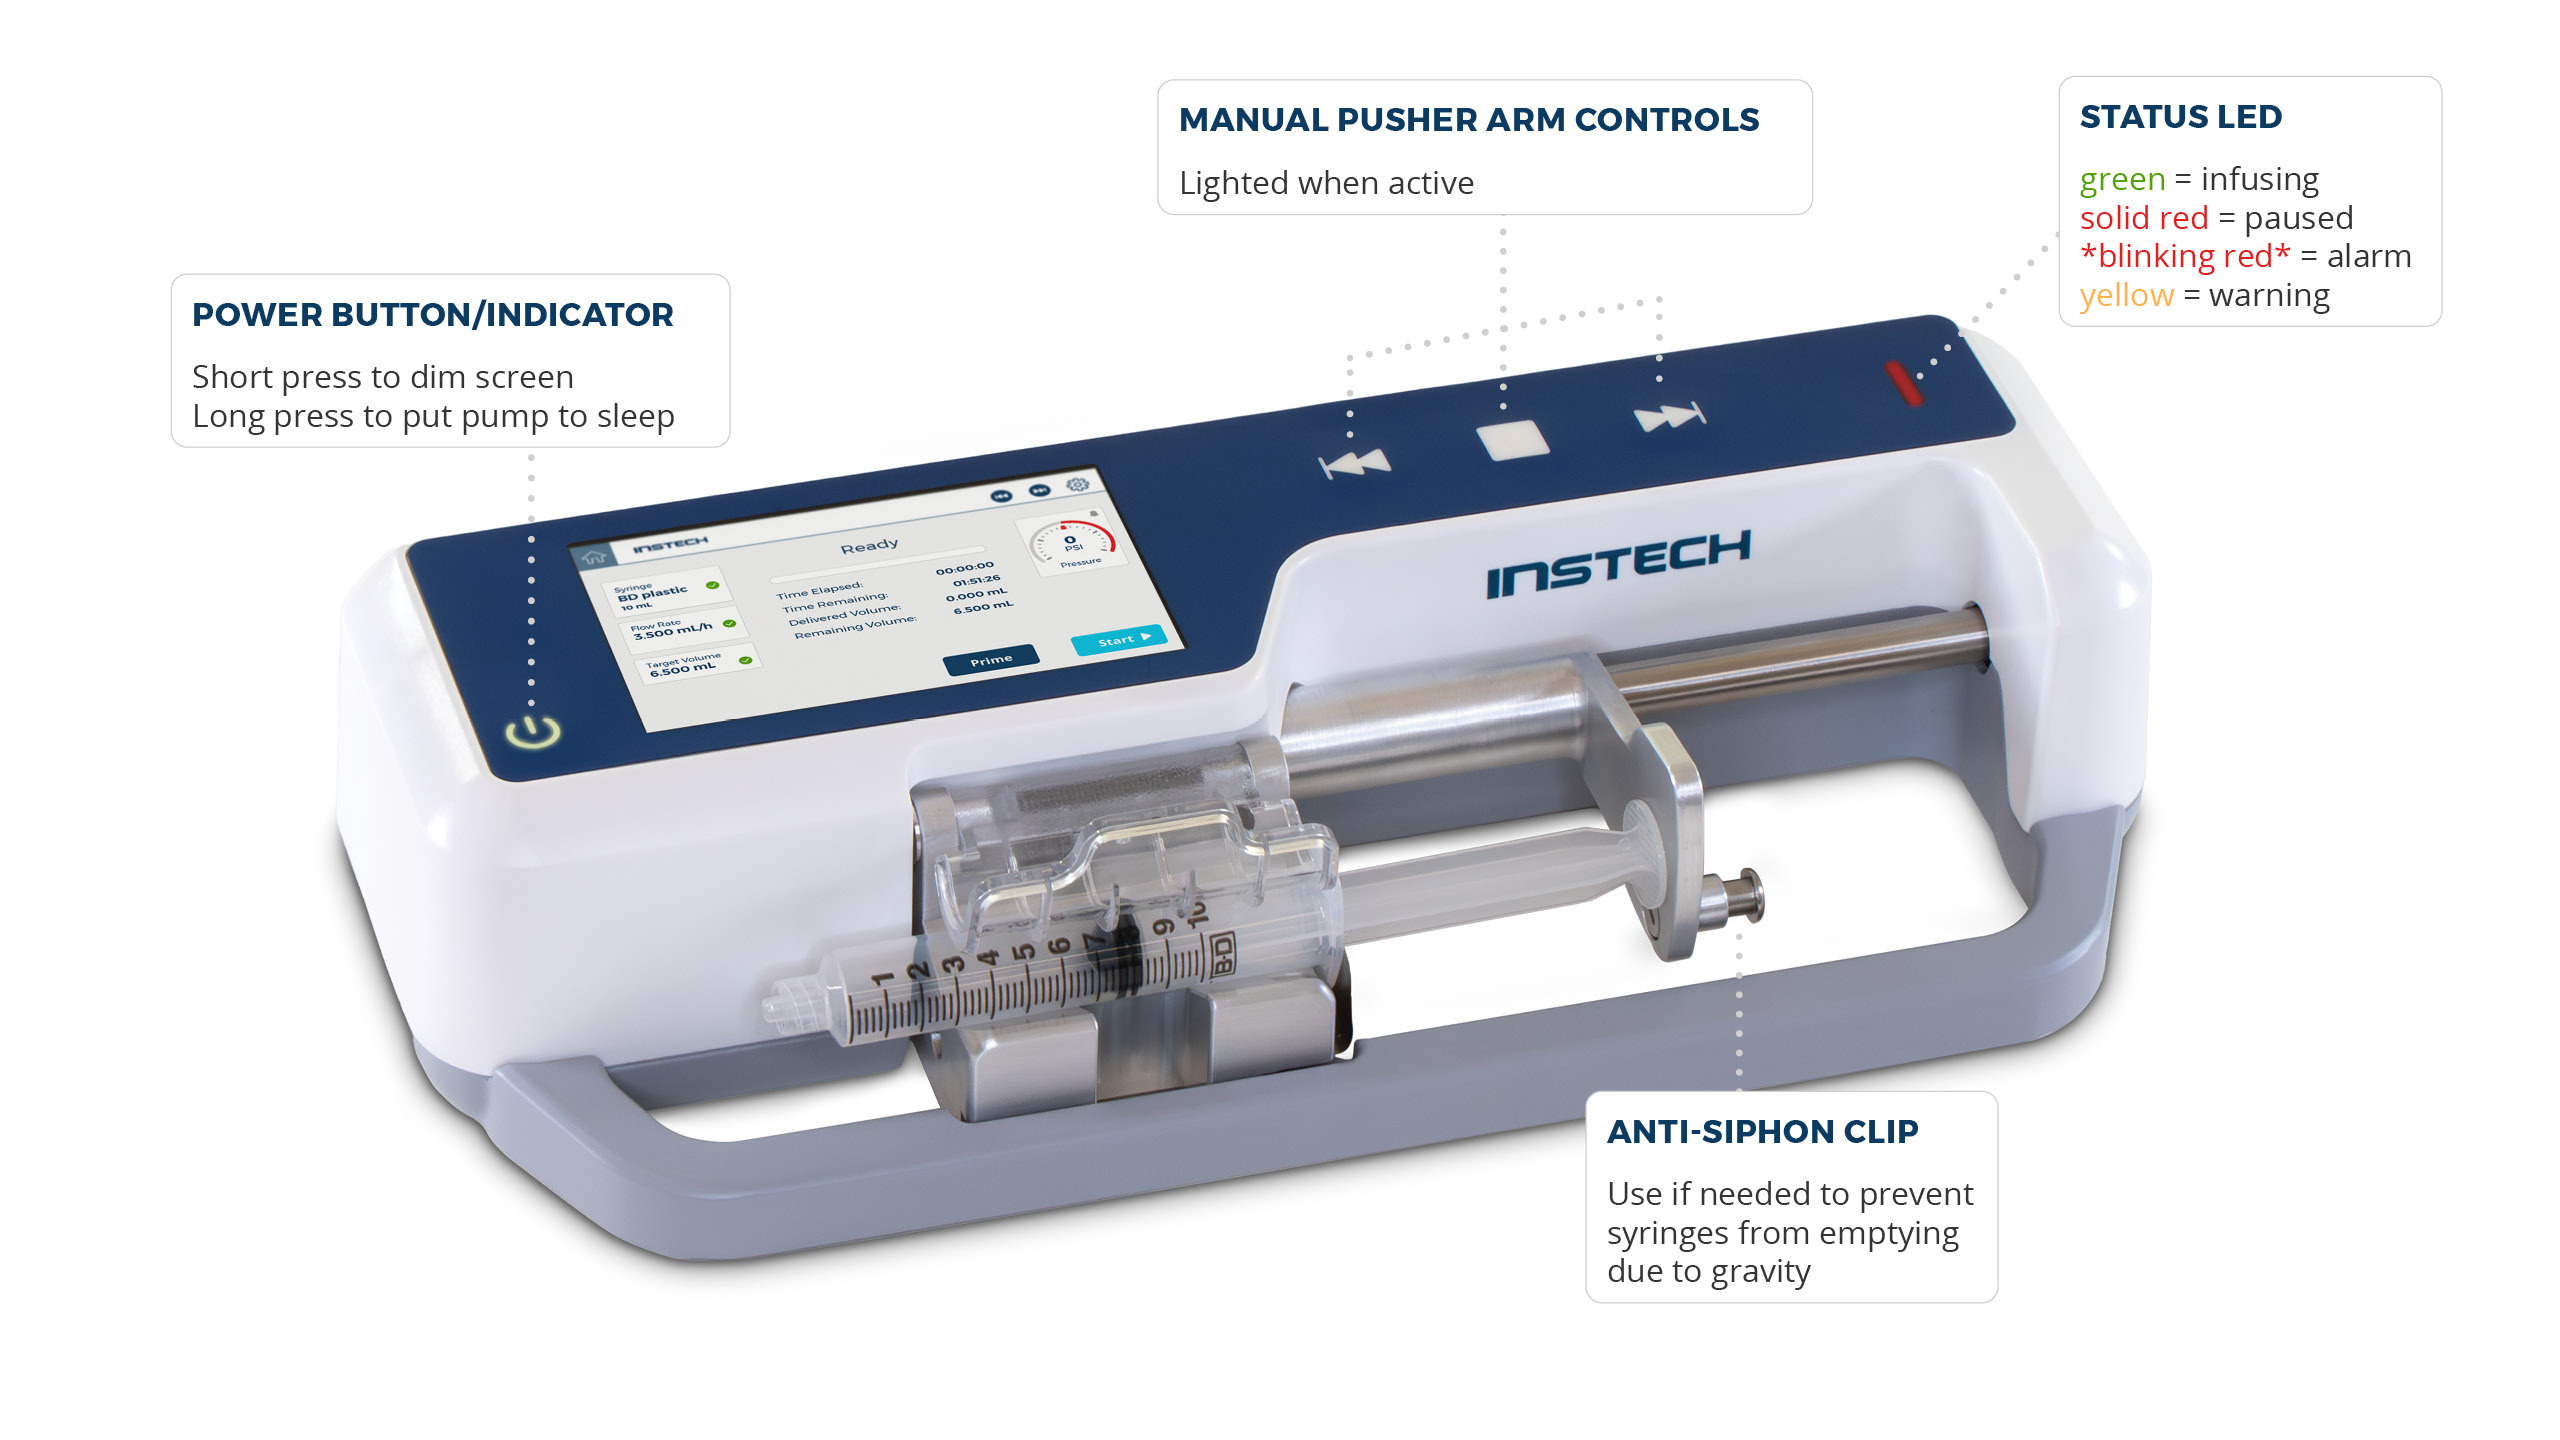
Pump Overview
Pump Controls
Main Screen
Rear Connections
Quick Start
- Plug it in.
- Load your syringe, with syringe flange inside clip.
- Select syringe manufacturer/type and size (the pump will auto select the size if the syringe has a unique outer diameter).
- Enter flow rate, units and target volume. (Alternatively you may enter flow rate and duration or target volume and duration by changing the Infusion Mode in Settings.)
- Press
 button to engage syringe.
 - Optionally, press and hold Prime to prime your infusion line using the pump.
- Press Start to infuse.
Specifications and Declarations of Conformity
See https://www.instechlabs.com/hubfs/pdfs/specifications/P400.pdf
Intended Use
Laboratory animal research. Not for human or veterinary use.
Operation
Setting up the Pump
Positioning
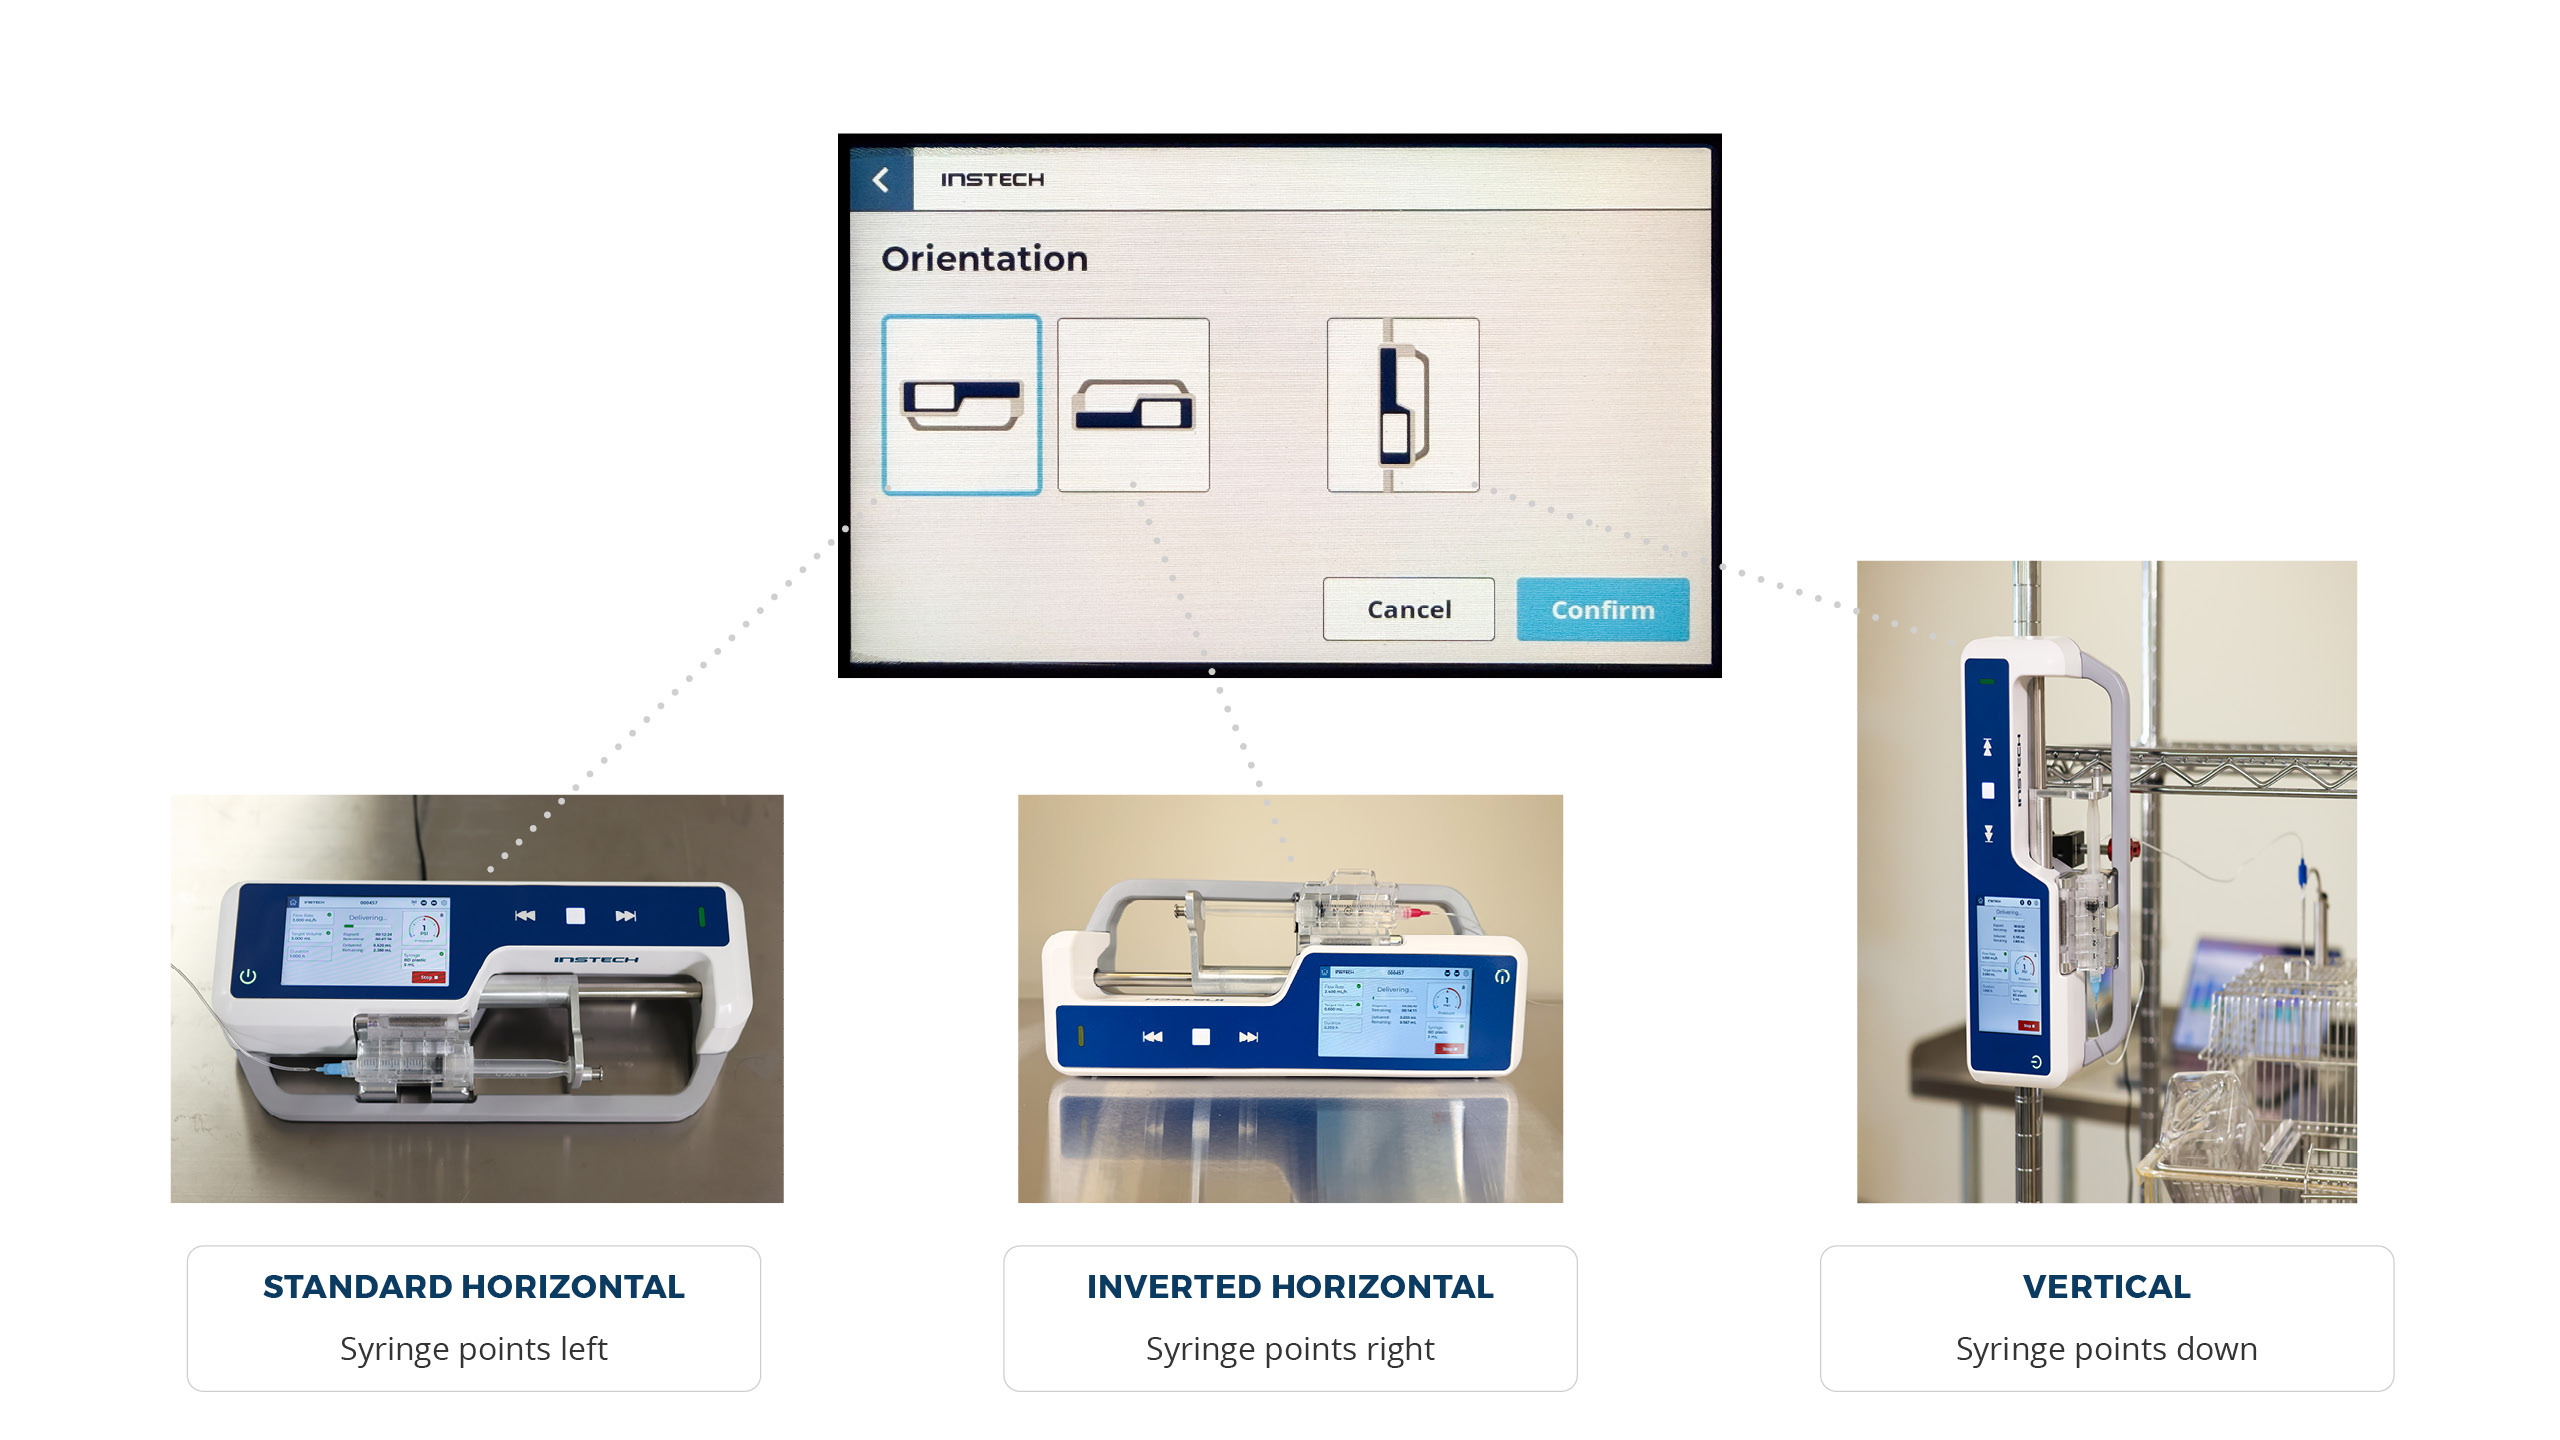
The pump can be placed flat on a surface or mounted vertically or horizontally using optional mounting hardware. Change the screen orientation through the Settings menu to one of three choices: (1) Standard Horizontal, (2) Inverted Horizontal or (3) Vertical.
When in the Vertical setting the pump should be mounted vertically with the syringe facing down. If you use the Vertical setting with the pump horizontal, or conversely if you use one of the Horizontal settings with the pump oriented vertically, the pressure monitor and other features may not function properly. Do not mount the pump with the syringe facing up.
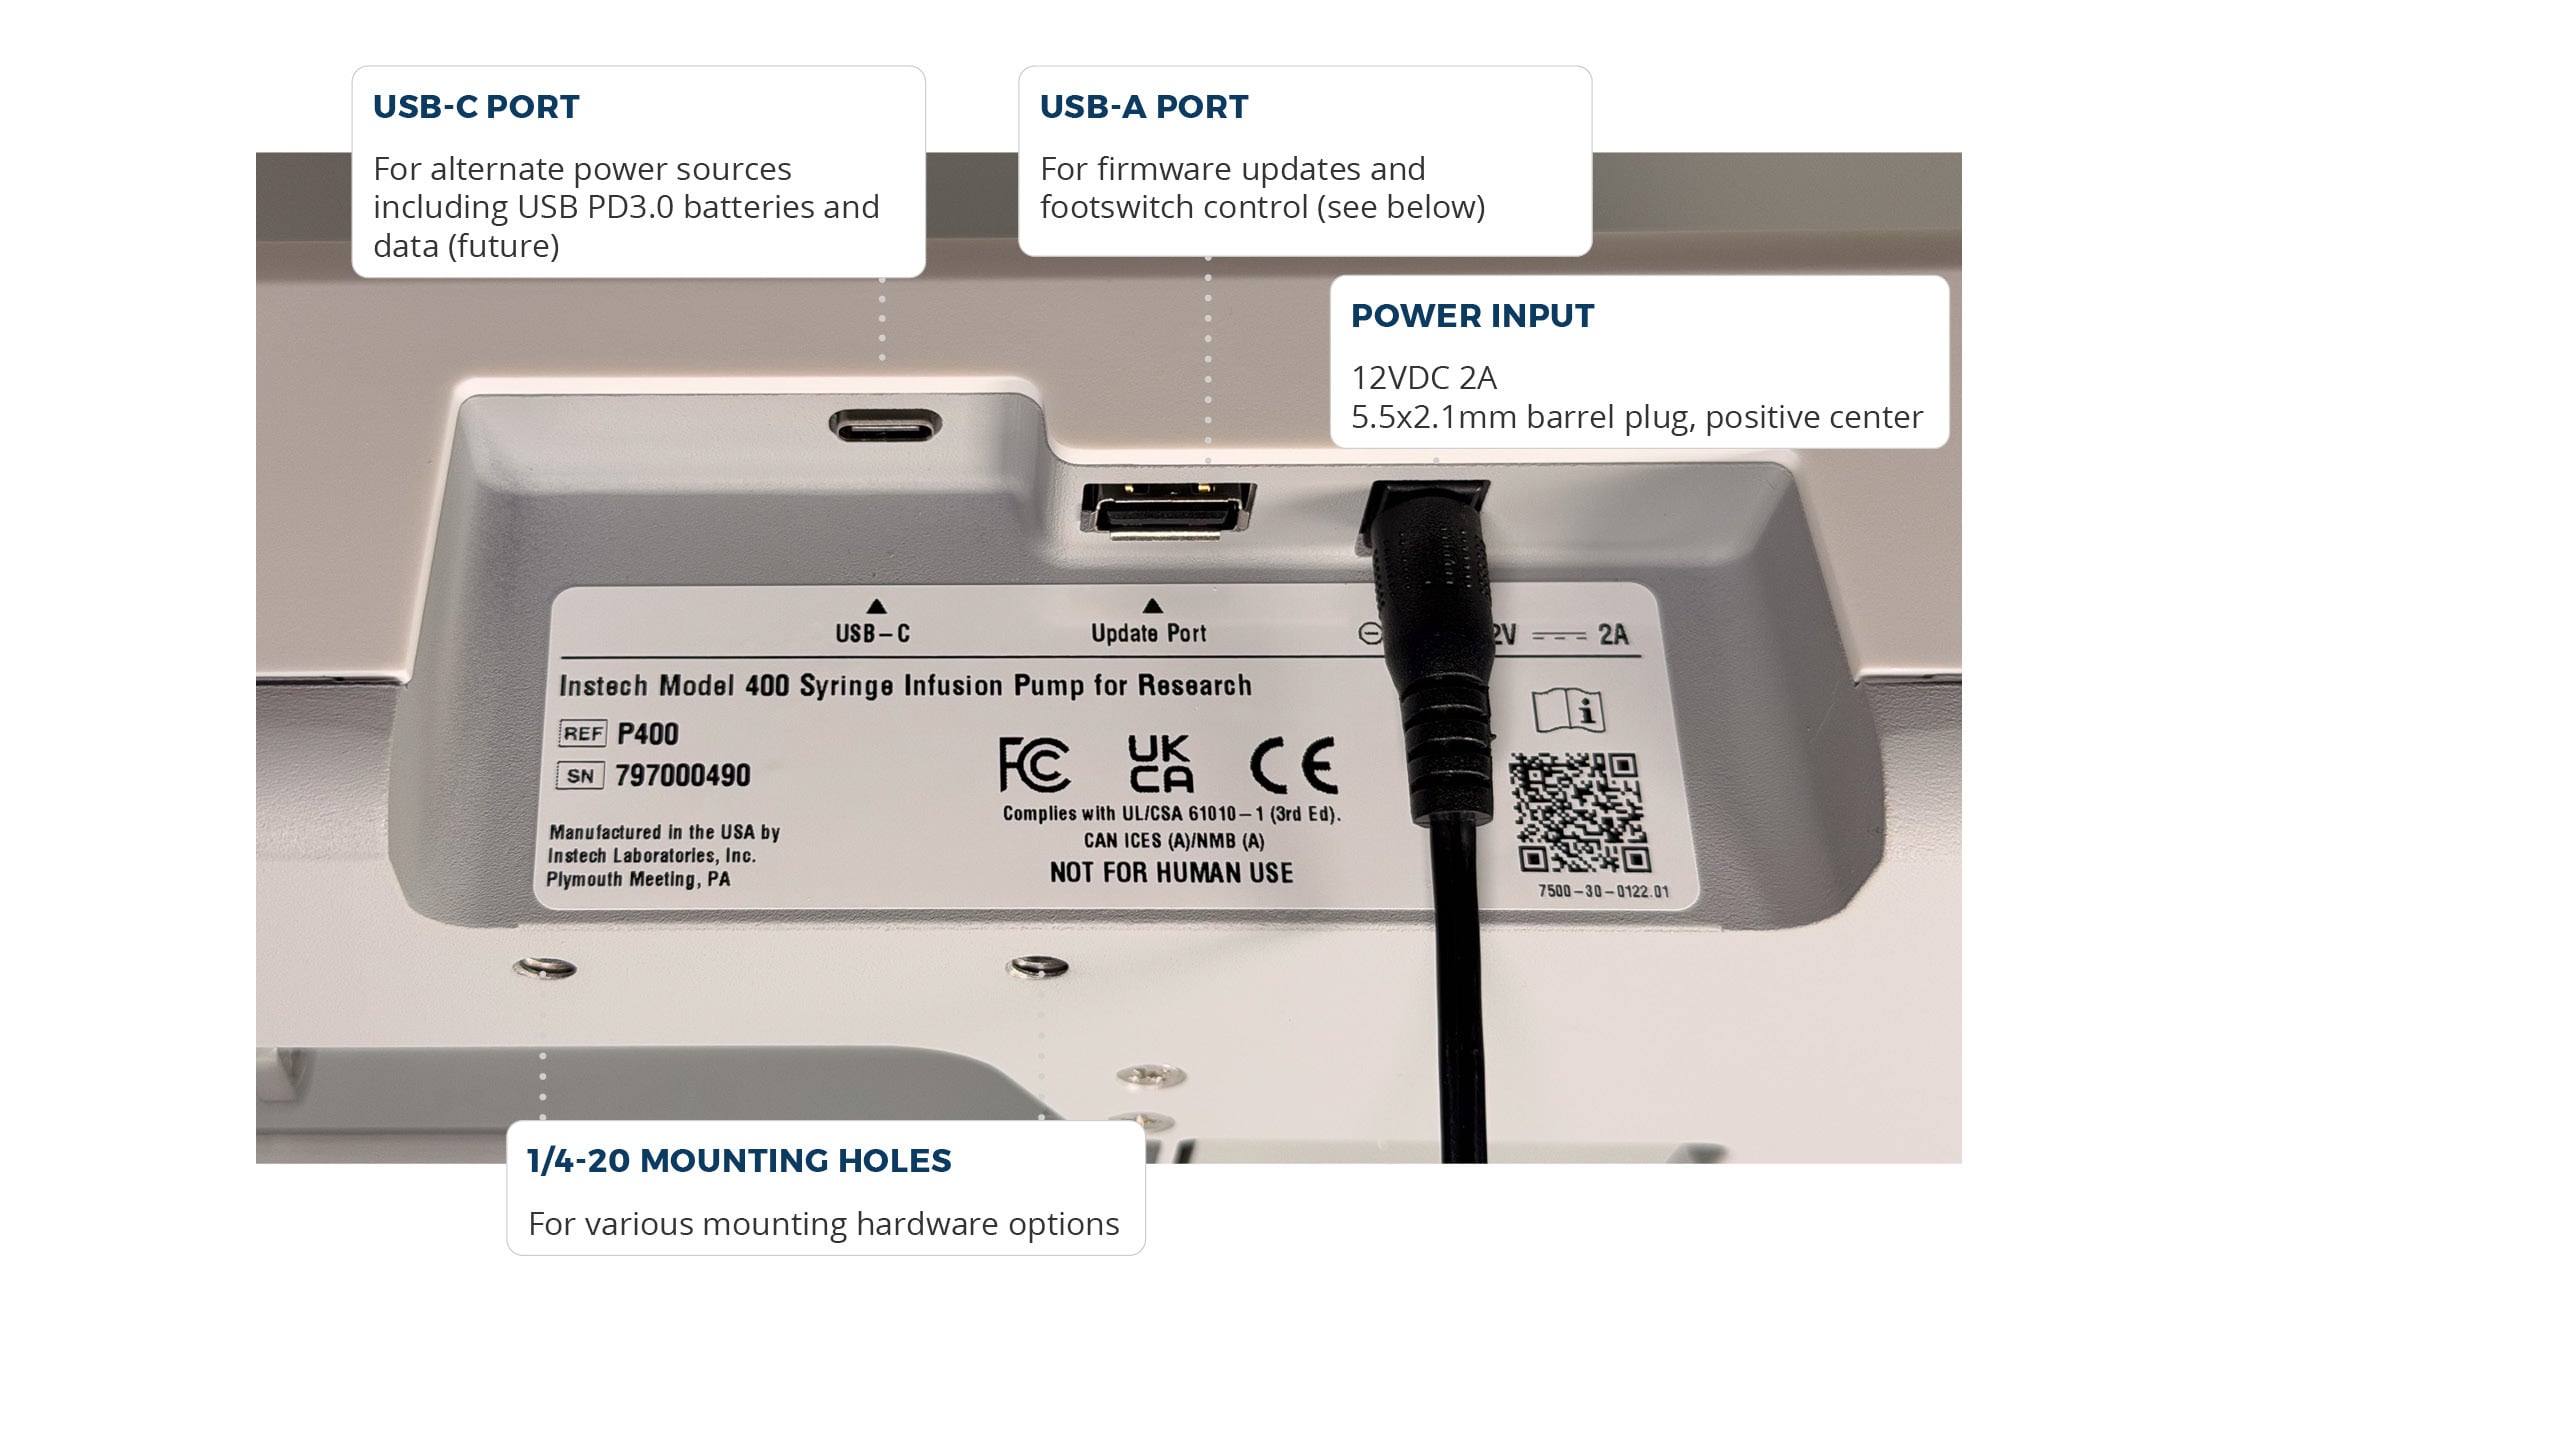
Power
The standard power source is the 12VDC 2A adapter included with the pump. Contact Instech if you need streamlined power cabling or uninterruptible power supplies with battery backup for a group of pumps. If you need portability, or are not near AC power, you can run the pump with a USB PD3.0 battery pack that can deliver 12V at 2A; plug it into the USB-C connector. A small 10000mAh pack will run the pump for many hours.
If power is interrupted during an infusion, the pump will auto-resume when the power is restored. Auto-resume will persist for outages up to 12 hours, and will give you 3 seconds to cancel it in case you are powering up and it is no longer relevant.
Syringe Selection
Syringe Library
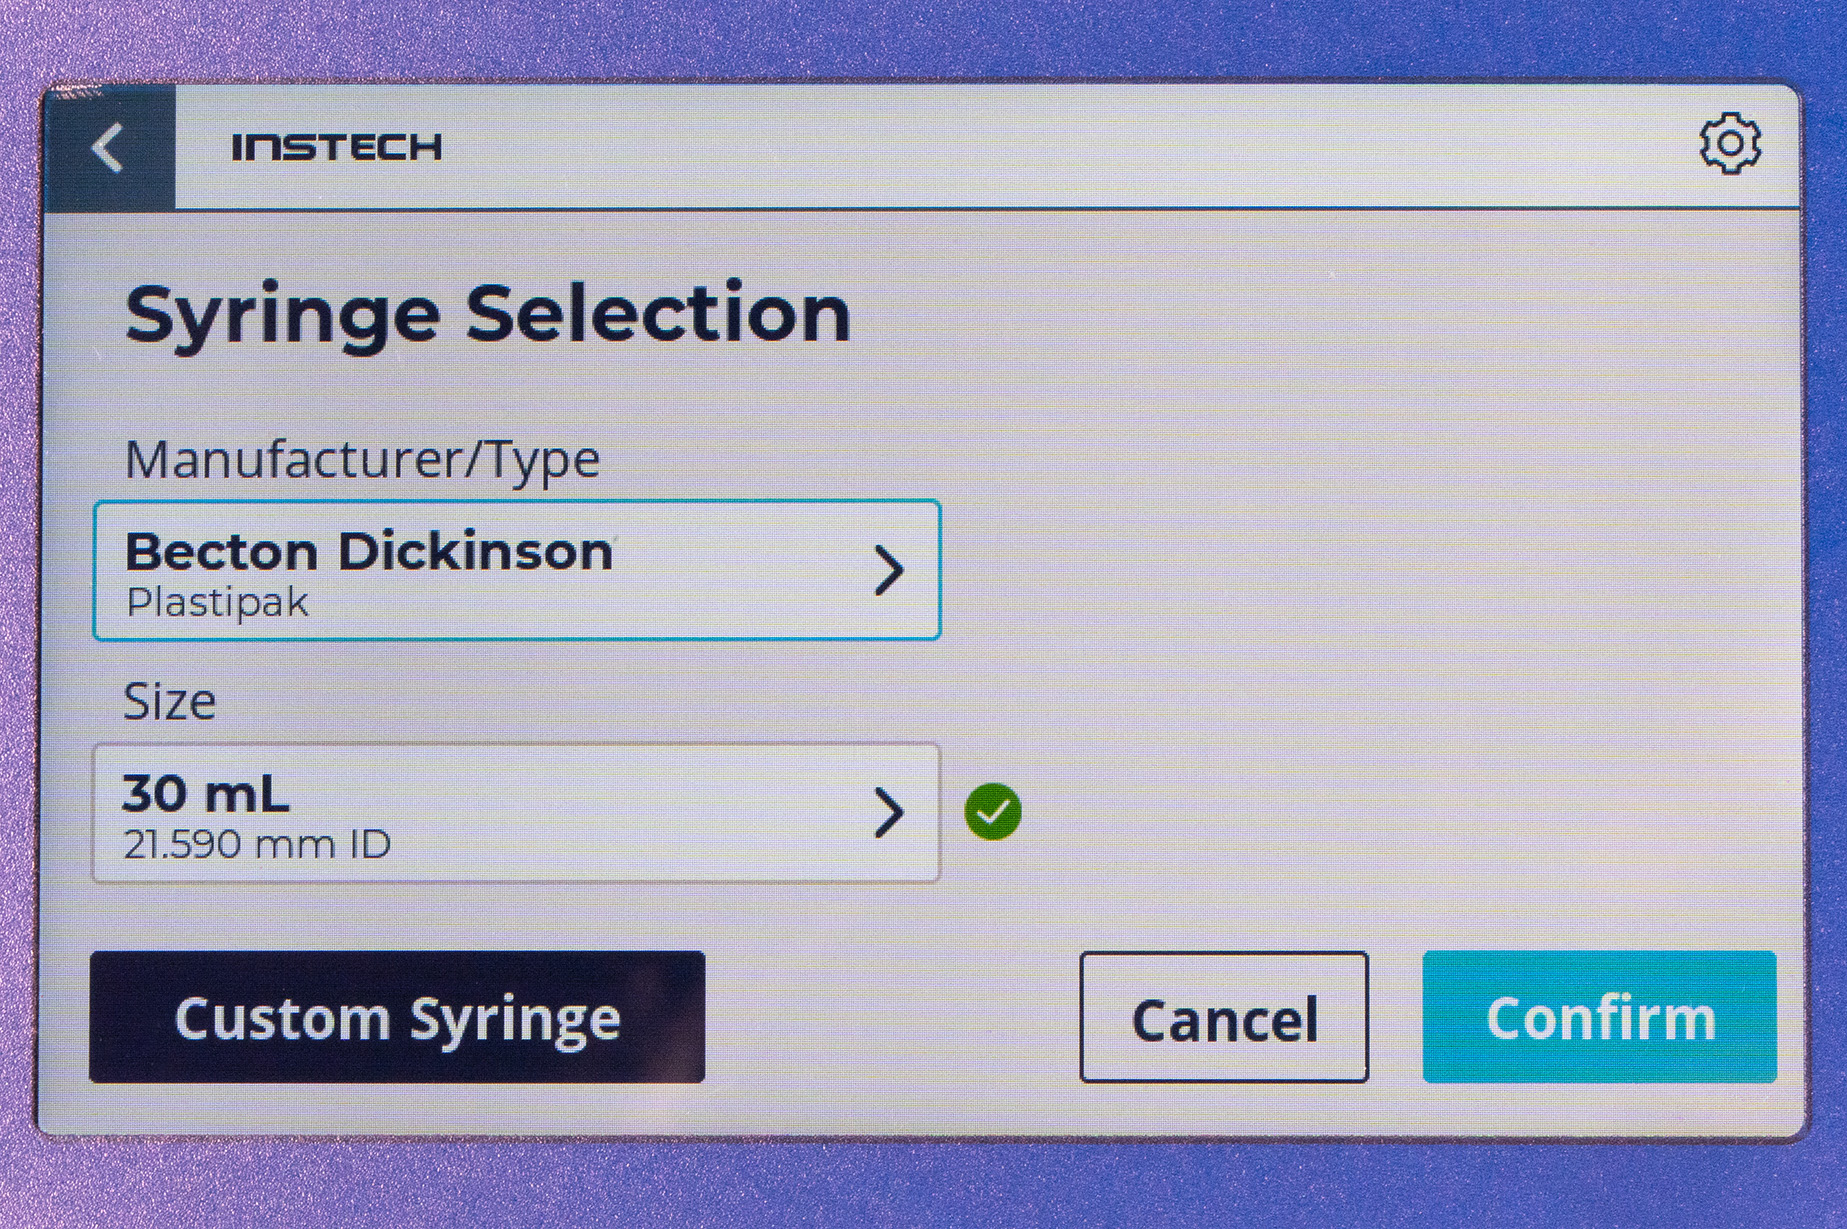
The P400 pump includes a library of syringes from BD (plastic and glass), HSW/Norm-Ject, Hamilton, Terumo and Nipro (Japan). Once you have selected the syringe manufacturer/type, if your syringe is installed and the syringe has a unique outer diameter, the pump will auto detect the size and display a green check mark. You may also manually select the syringe and then install it later. If your syringe does not have a unique OD, as is the case for some Hamilton syringes, you will need to manually select the syringe size.
The syringe library contains information on critical syringe dimensions including inner diameter (ID) for flow rate calculations, outer diameter for detection, and empty position. It is a good idea to check that the ID, which is displayed in the size selection menu, matches the syringe you are using because syringe manufacturers occasionally change the shapes of their syringes. For example, Monoject syringes are not in the library due to inconsistent inner diameters. Nipro syringes, in particular the 5, 10 and 20mL sizes, can vary by geography. The Nipro syringes sold in Japan are in the library, but defaulted to disabled to avoid confusion.
The syringe type and size will determine max and min flow rates, max volume limits, and whether the Pressure Monitor, Auto-Close and Auto-Open functions are active.
See the P400 Syringe Library for details and see below for descriptions of these functions.
If you only use certain types of syringes and do not want the others to appear you can disable and enable syringe families from the Calibrate menu (see Calibration below).
Custom Syringe
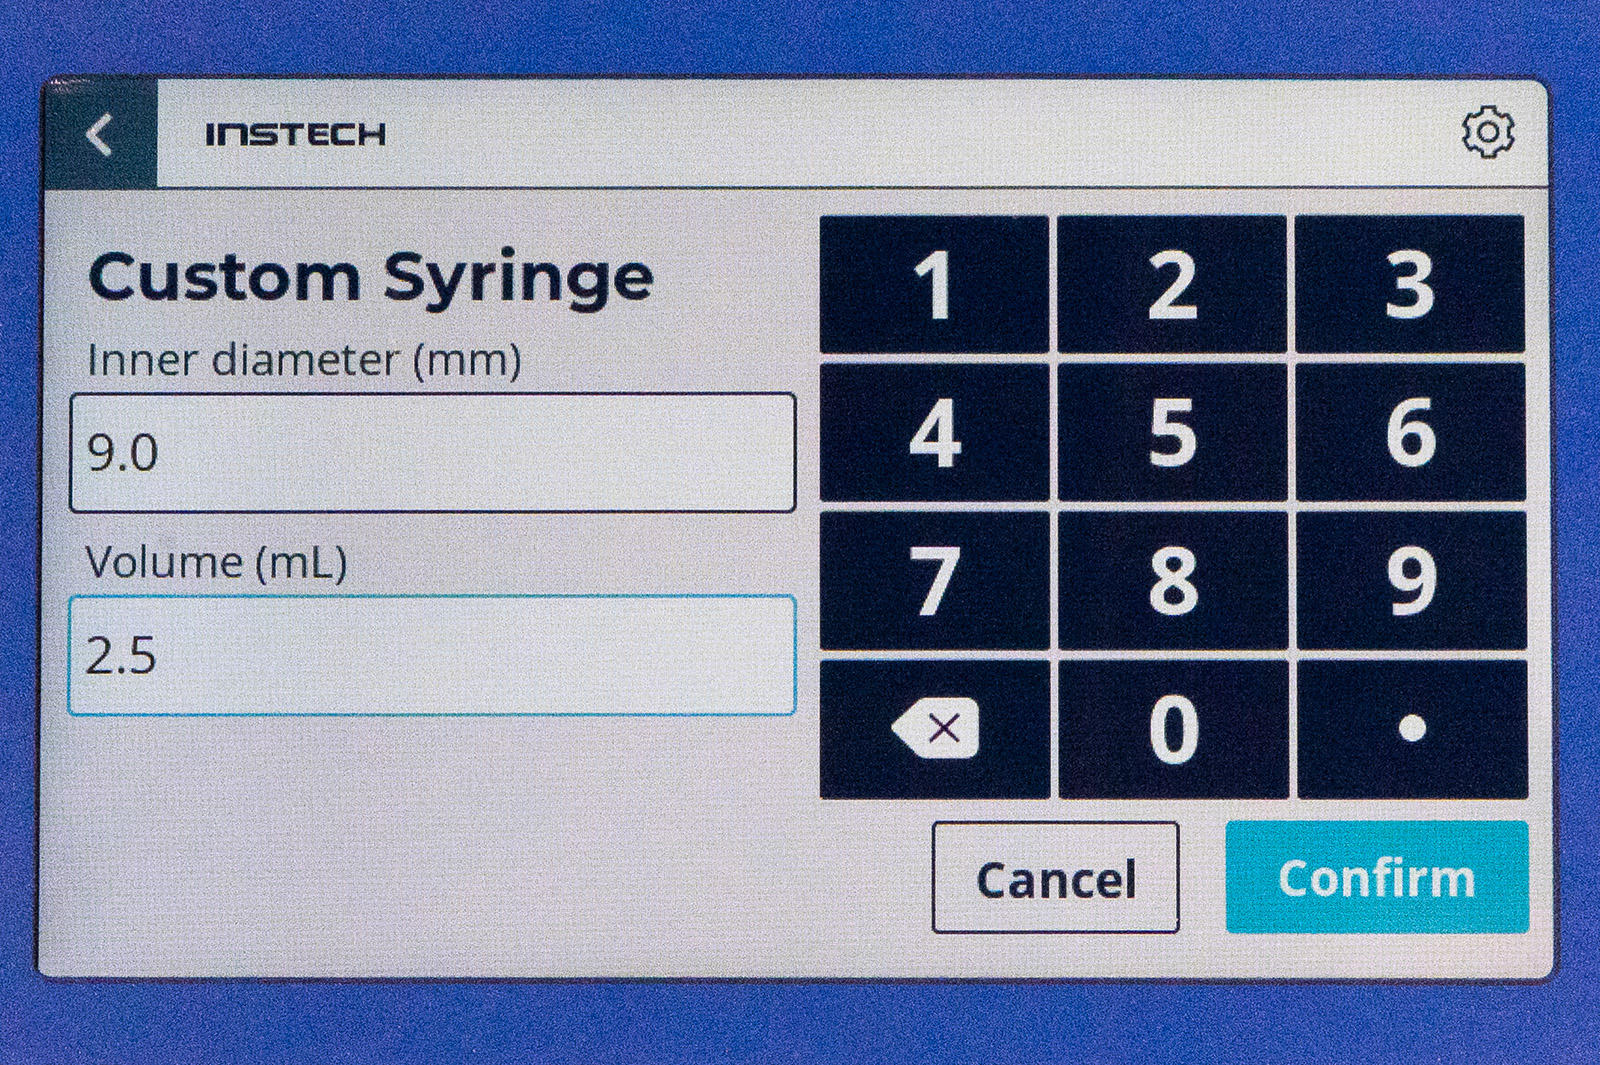
To use a syringe that is not in the library, press the Custom Syringe button. Enter the ID in mm and volume in mL, install the syringe so that the pump can record the outer diameter, and press Confirm. The Pressure Monitor will function with IDs larger than 4.5mm, but Auto-Close and Auto-Open will be disabled for all custom syringes. You cannot save a custom syringe to the library (library syringes require additional testing), but the syringe will remain active until you change to a different one.
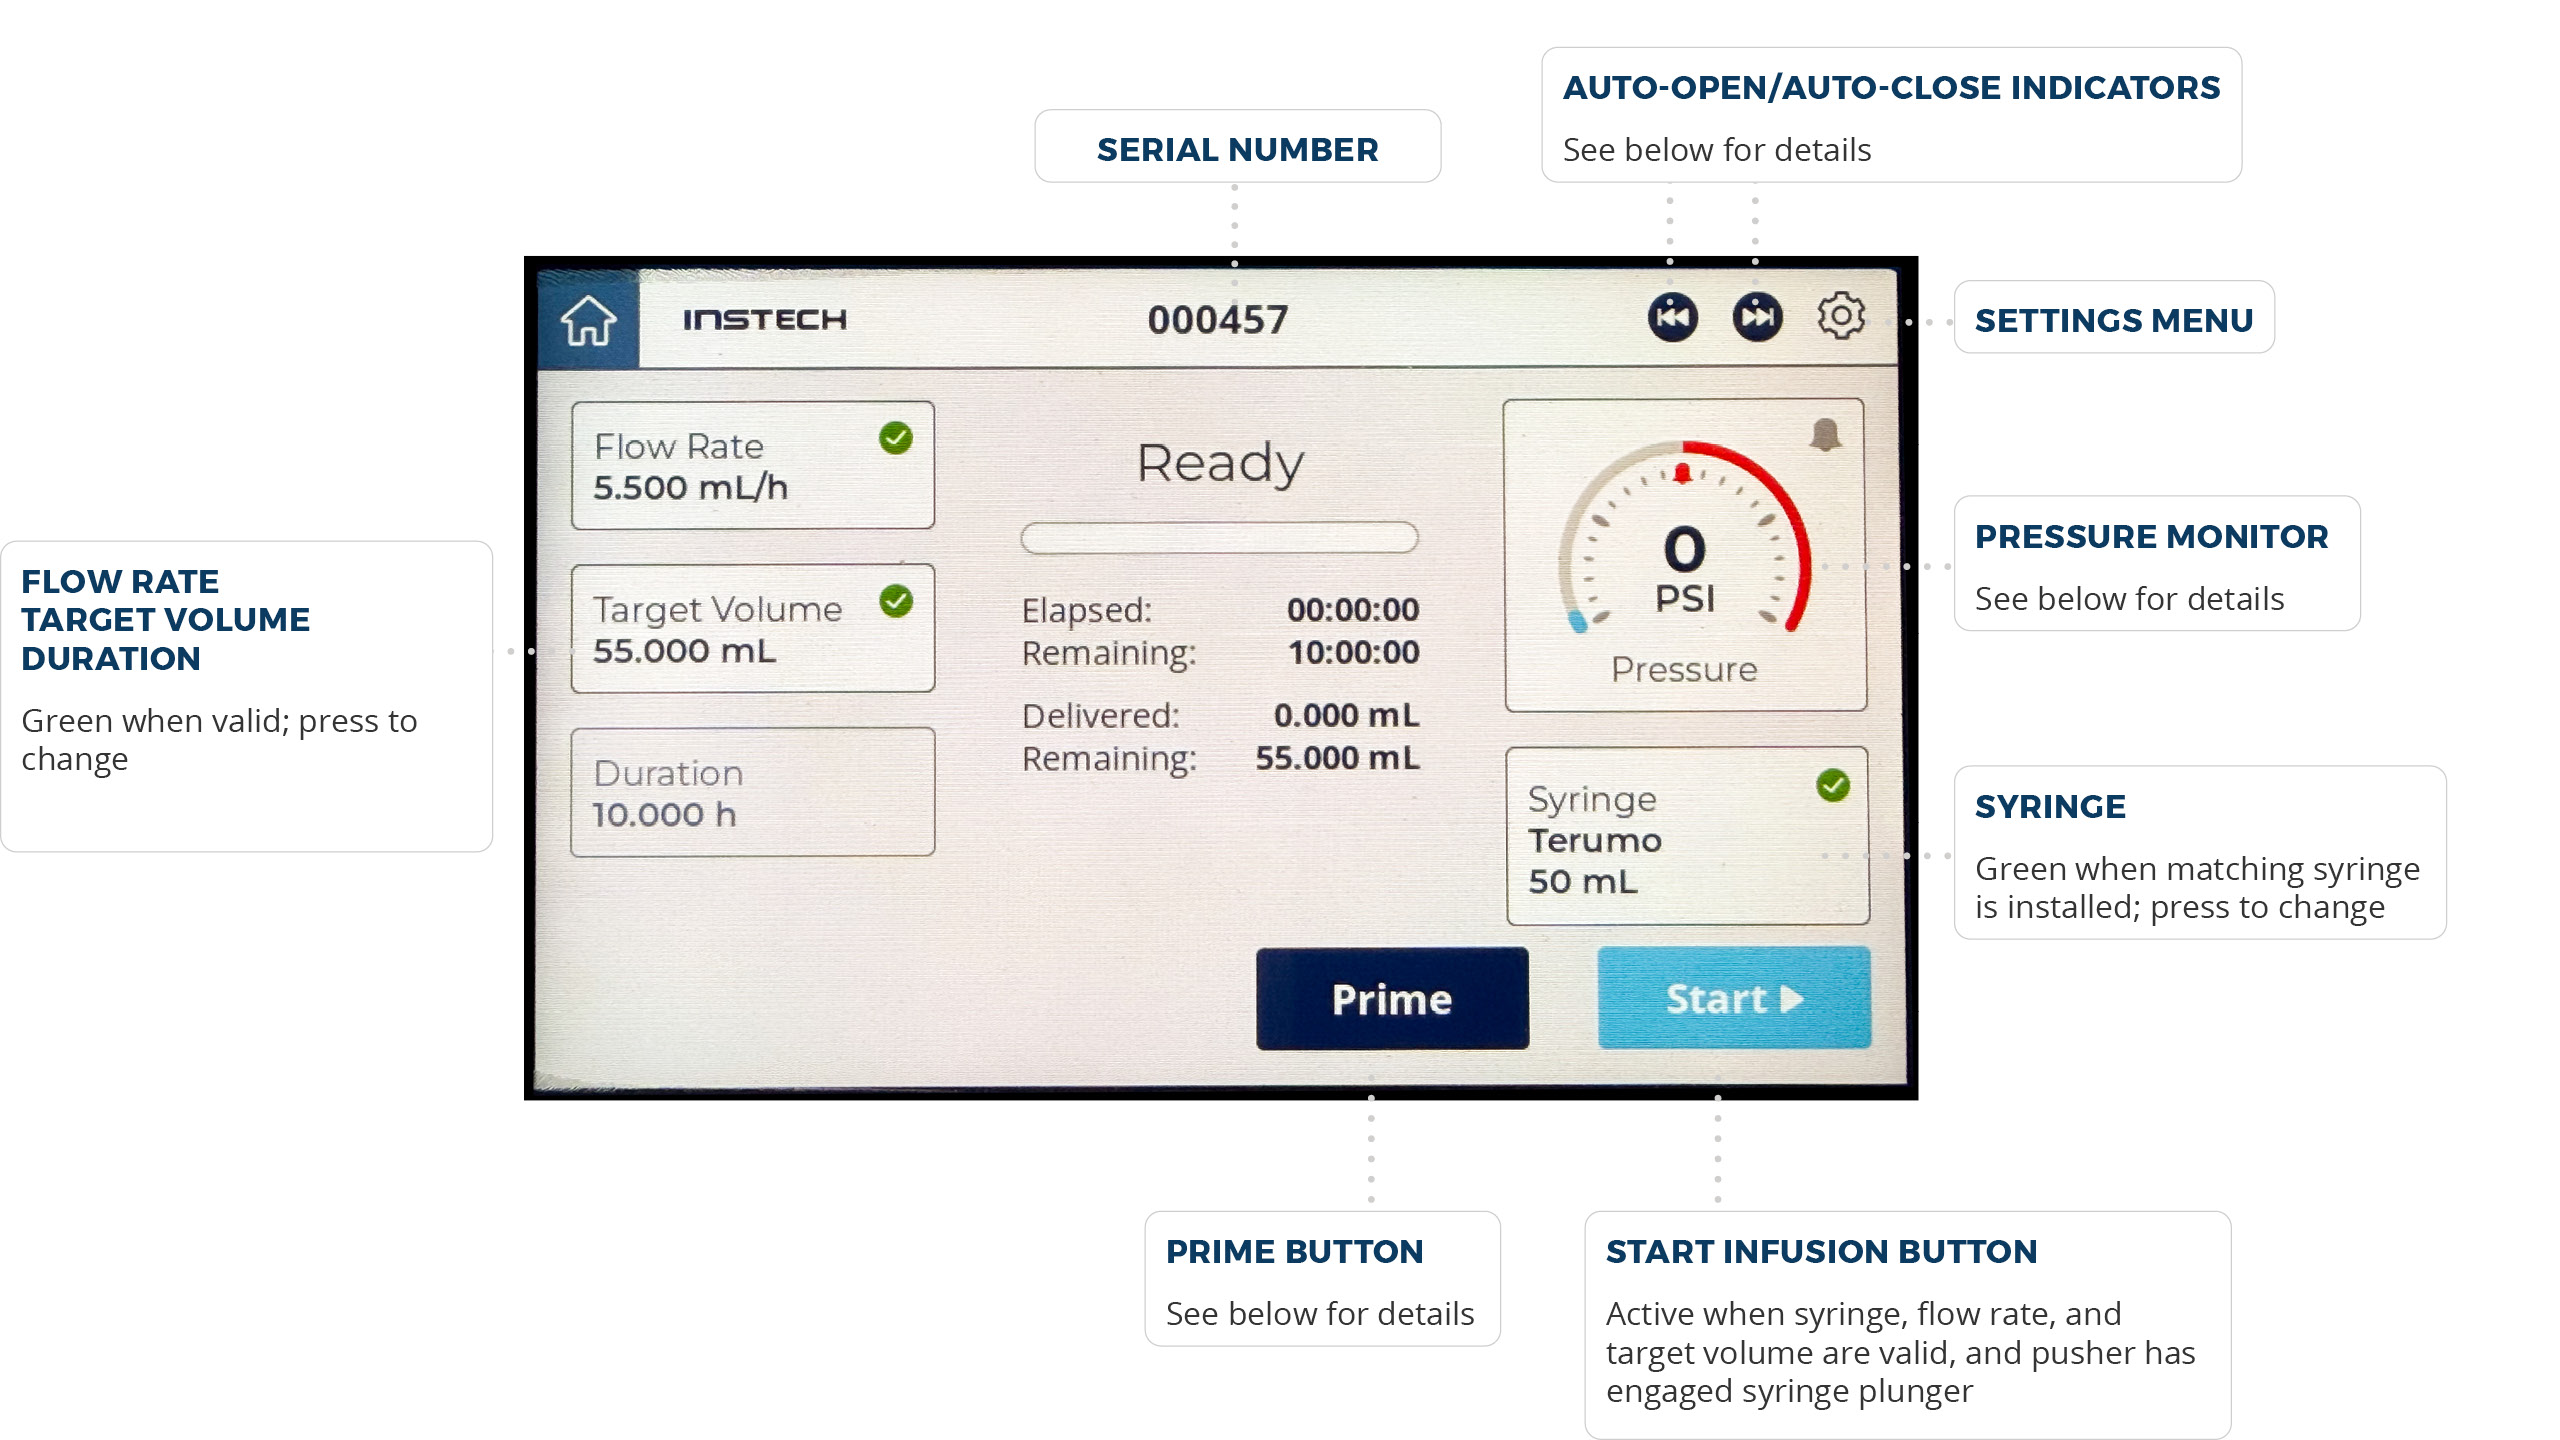
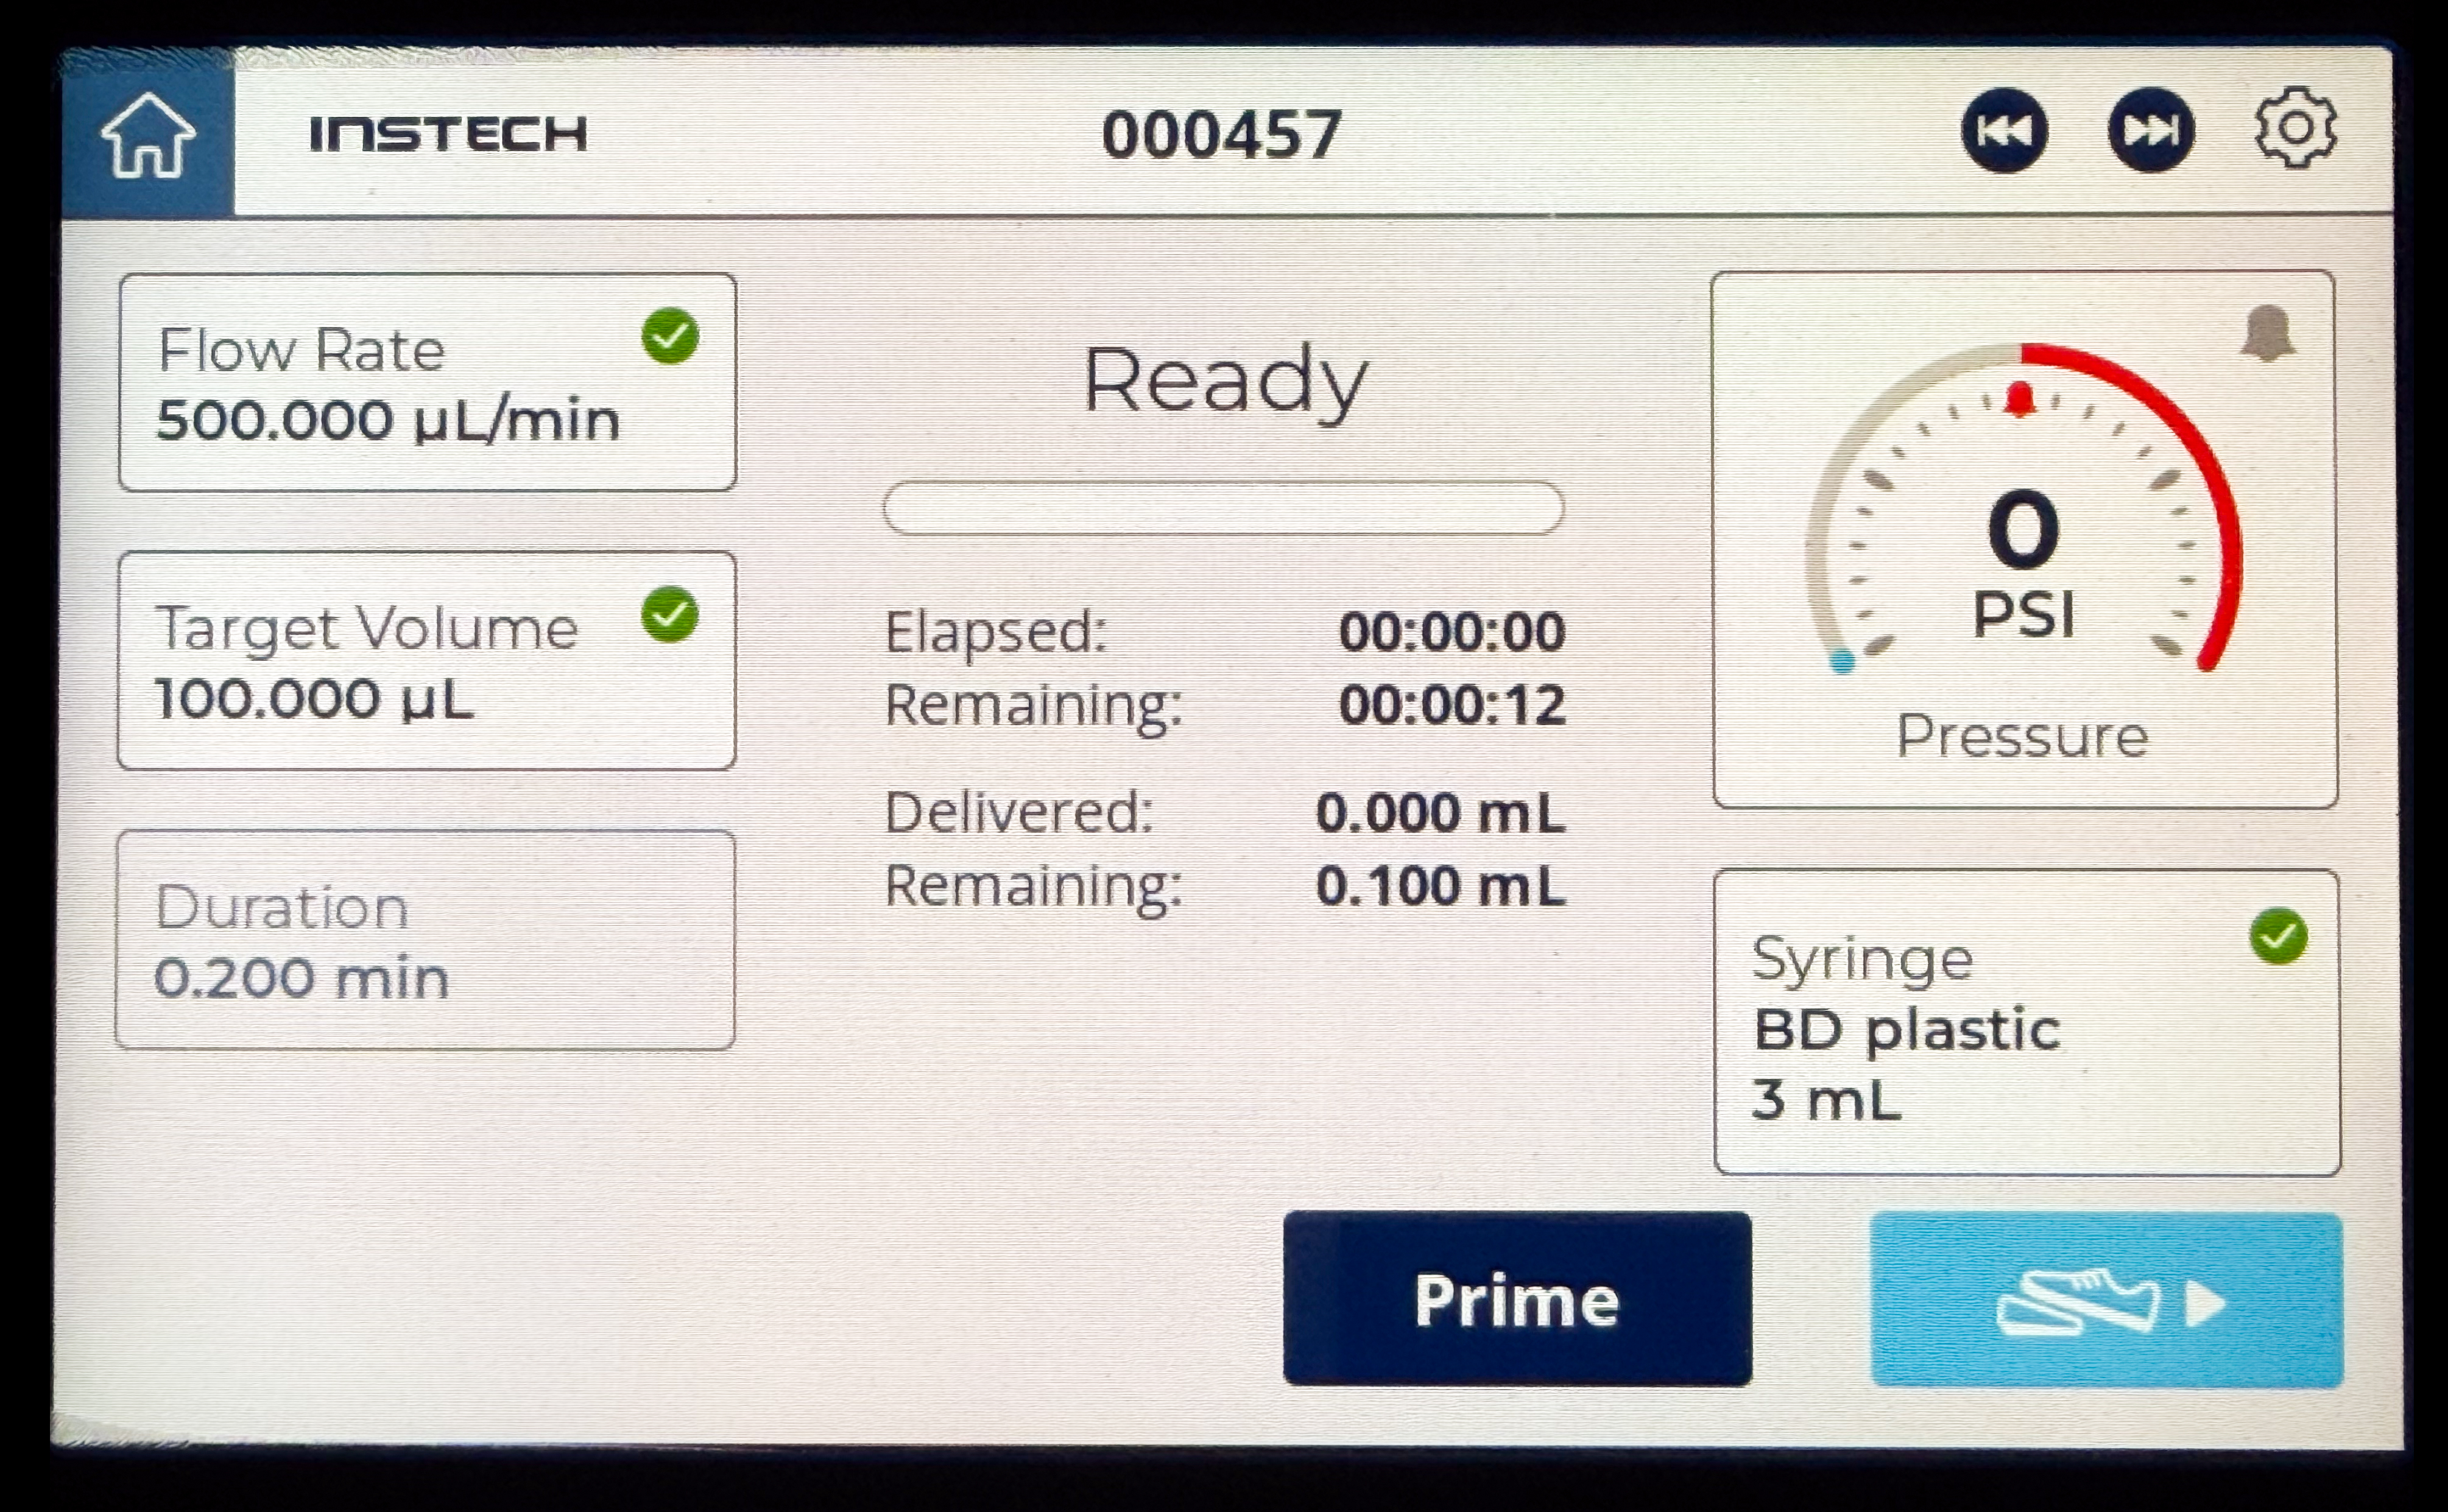
Infusion Profile (Flow Rate, Target Volume and Duration)
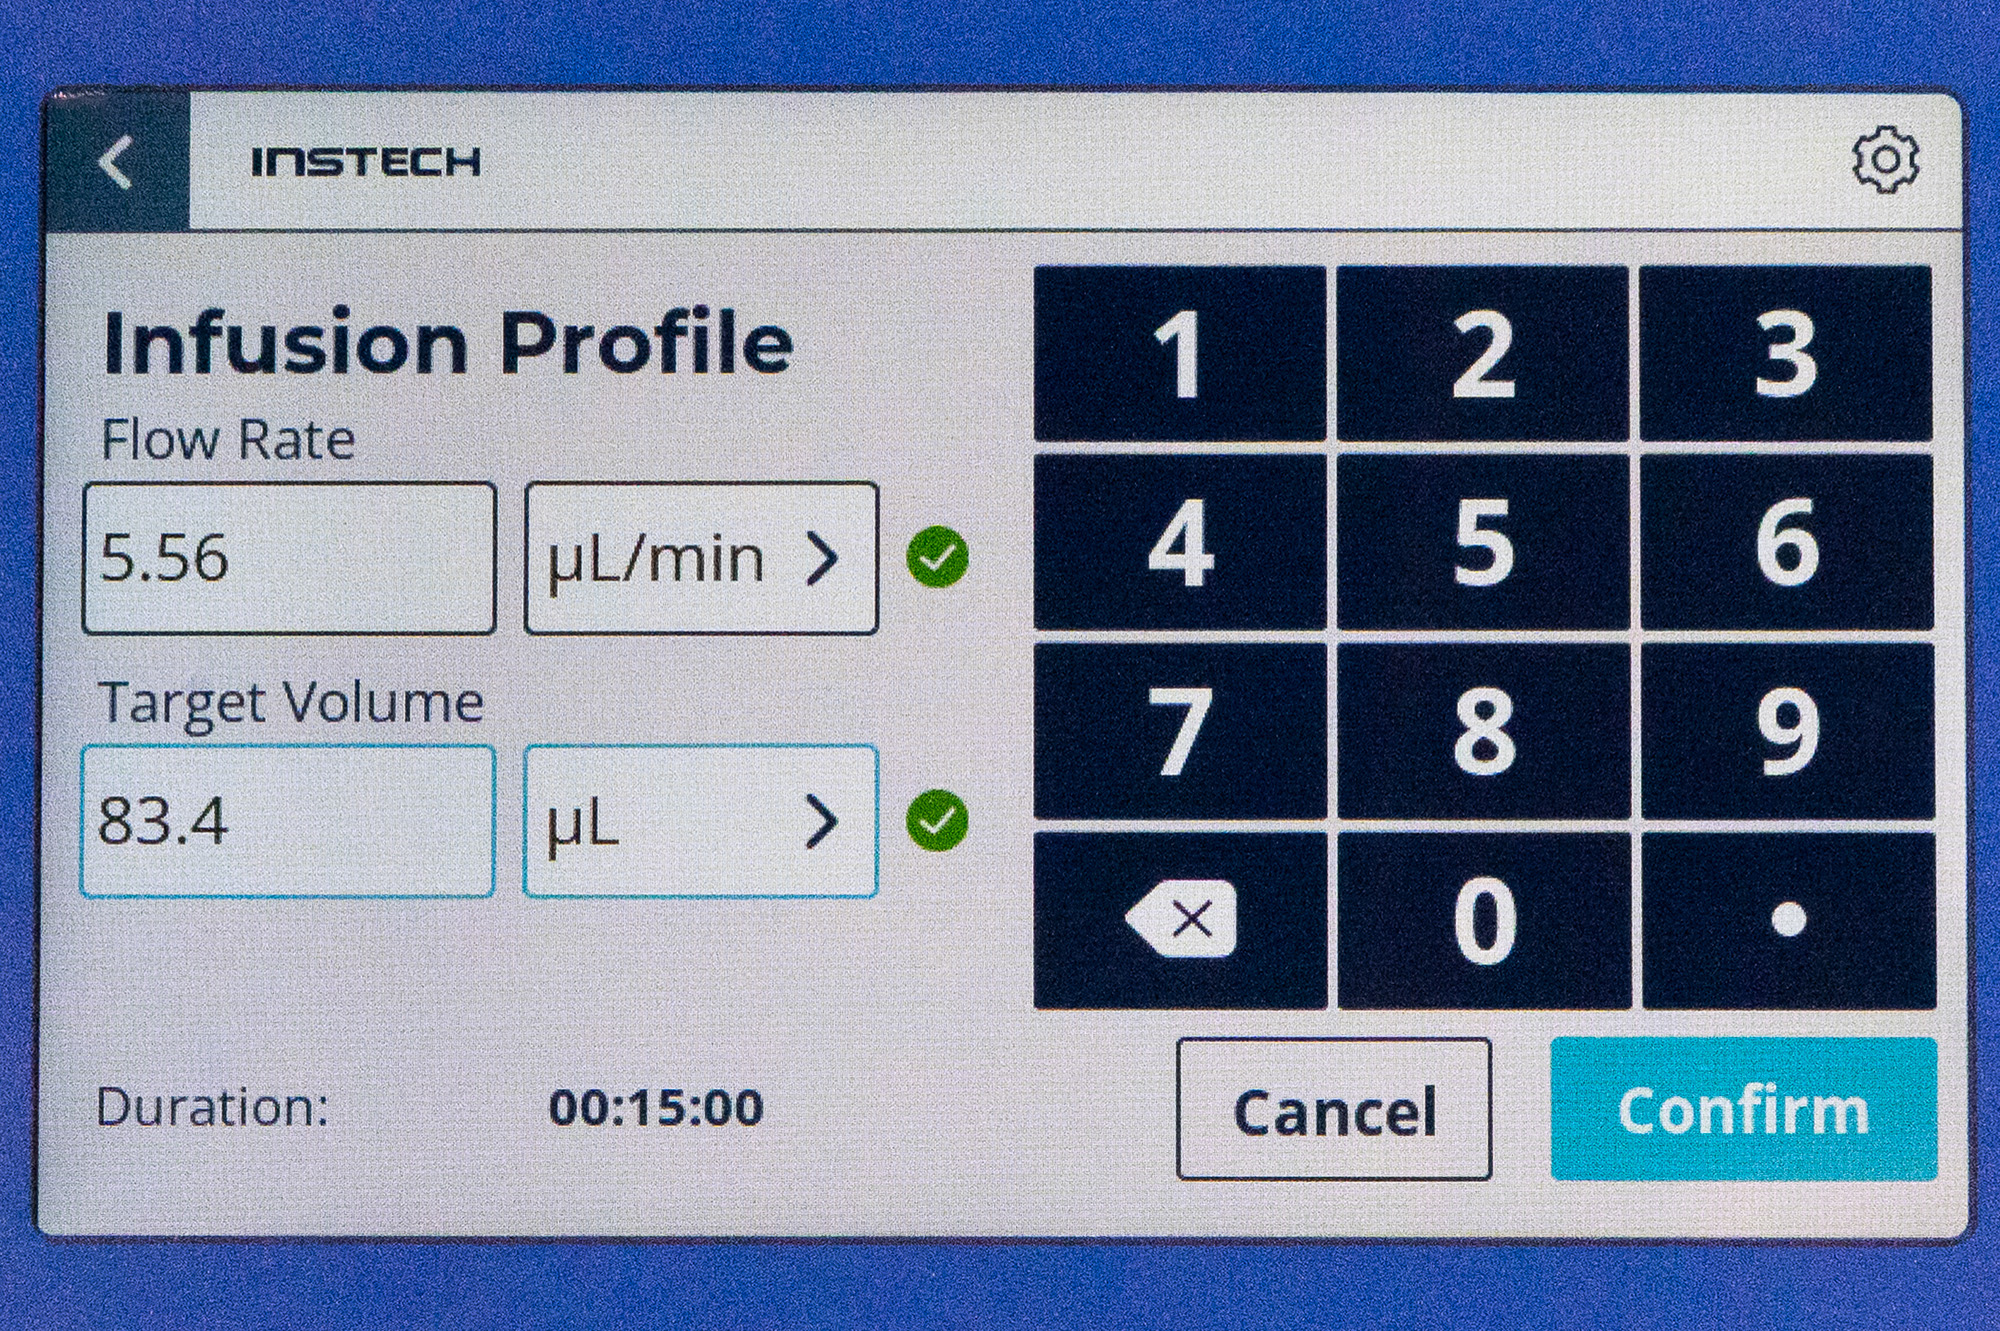
In the Infusion Profile screen you will choose two of three parameters (flow rate, target volume, duration) and the pump will calculate the third. The default mode is {Rate, Volume}. To change to {Rate, Time} or {Volume, Time} select Infusion Mode in the Settings menu.
Enter your parameters and choose units. The following combinations are possible:
| Flow Rate Units | Target Volume Units | Duration Units |
| mL/min | mL | min |
| mL/h | mL | h |
| µL/min | µL | min |
| µL/h | µL | h |
If you change the unit for one parameter, units for other parameters will adjust accordingly. For example, you are not able to set a flow rate in mL/h or mL/min but a target volume in µL; the target volume unit will change to mL for consistency. You will only be able to confirm the selections if they are within the limits for the syringe you have selected.
If you need to run a study without a defined target volume, such as a glucose clamp where rates will vary, enter the total volume of your syringe. In {Rate, Volume} mode you are able to change the flow rate while infusing without stopping the pump.
Engaging Syringe
When your syringe has been placed in the nest, press the ![]() button to engage the pusher arm. The P400 does not have a manual clutch like other syringe pumps. When Auto-Close is active (as indicated by the blue
button to engage the pusher arm. The P400 does not have a manual clutch like other syringe pumps. When Auto-Close is active (as indicated by the blue ![]() icon) a short press of the
icon) a short press of the ![]() button will close the arm and it will stop automatically when it senses the plunger. Auto-Close works with all standard plastic syringes, but some glass and microliter syringes have low friction and in those cases Auto-Close will be disabled and the icon will be grayed out. When disabled, you will need to close the pusher arm manually by holding down the
button will close the arm and it will stop automatically when it senses the plunger. Auto-Close works with all standard plastic syringes, but some glass and microliter syringes have low friction and in those cases Auto-Close will be disabled and the icon will be grayed out. When disabled, you will need to close the pusher arm manually by holding down the ![]() button. If the pump does sense the plunger it will stop, but if not release the button once the arm touches the syringe plunger.
button. If the pump does sense the plunger it will stop, but if not release the button once the arm touches the syringe plunger.
Once the arm has engaged the syringe and you have a valid syringe installed and a valid flow rate and target volume (three green check marks), the Start and Prime buttons will become active.
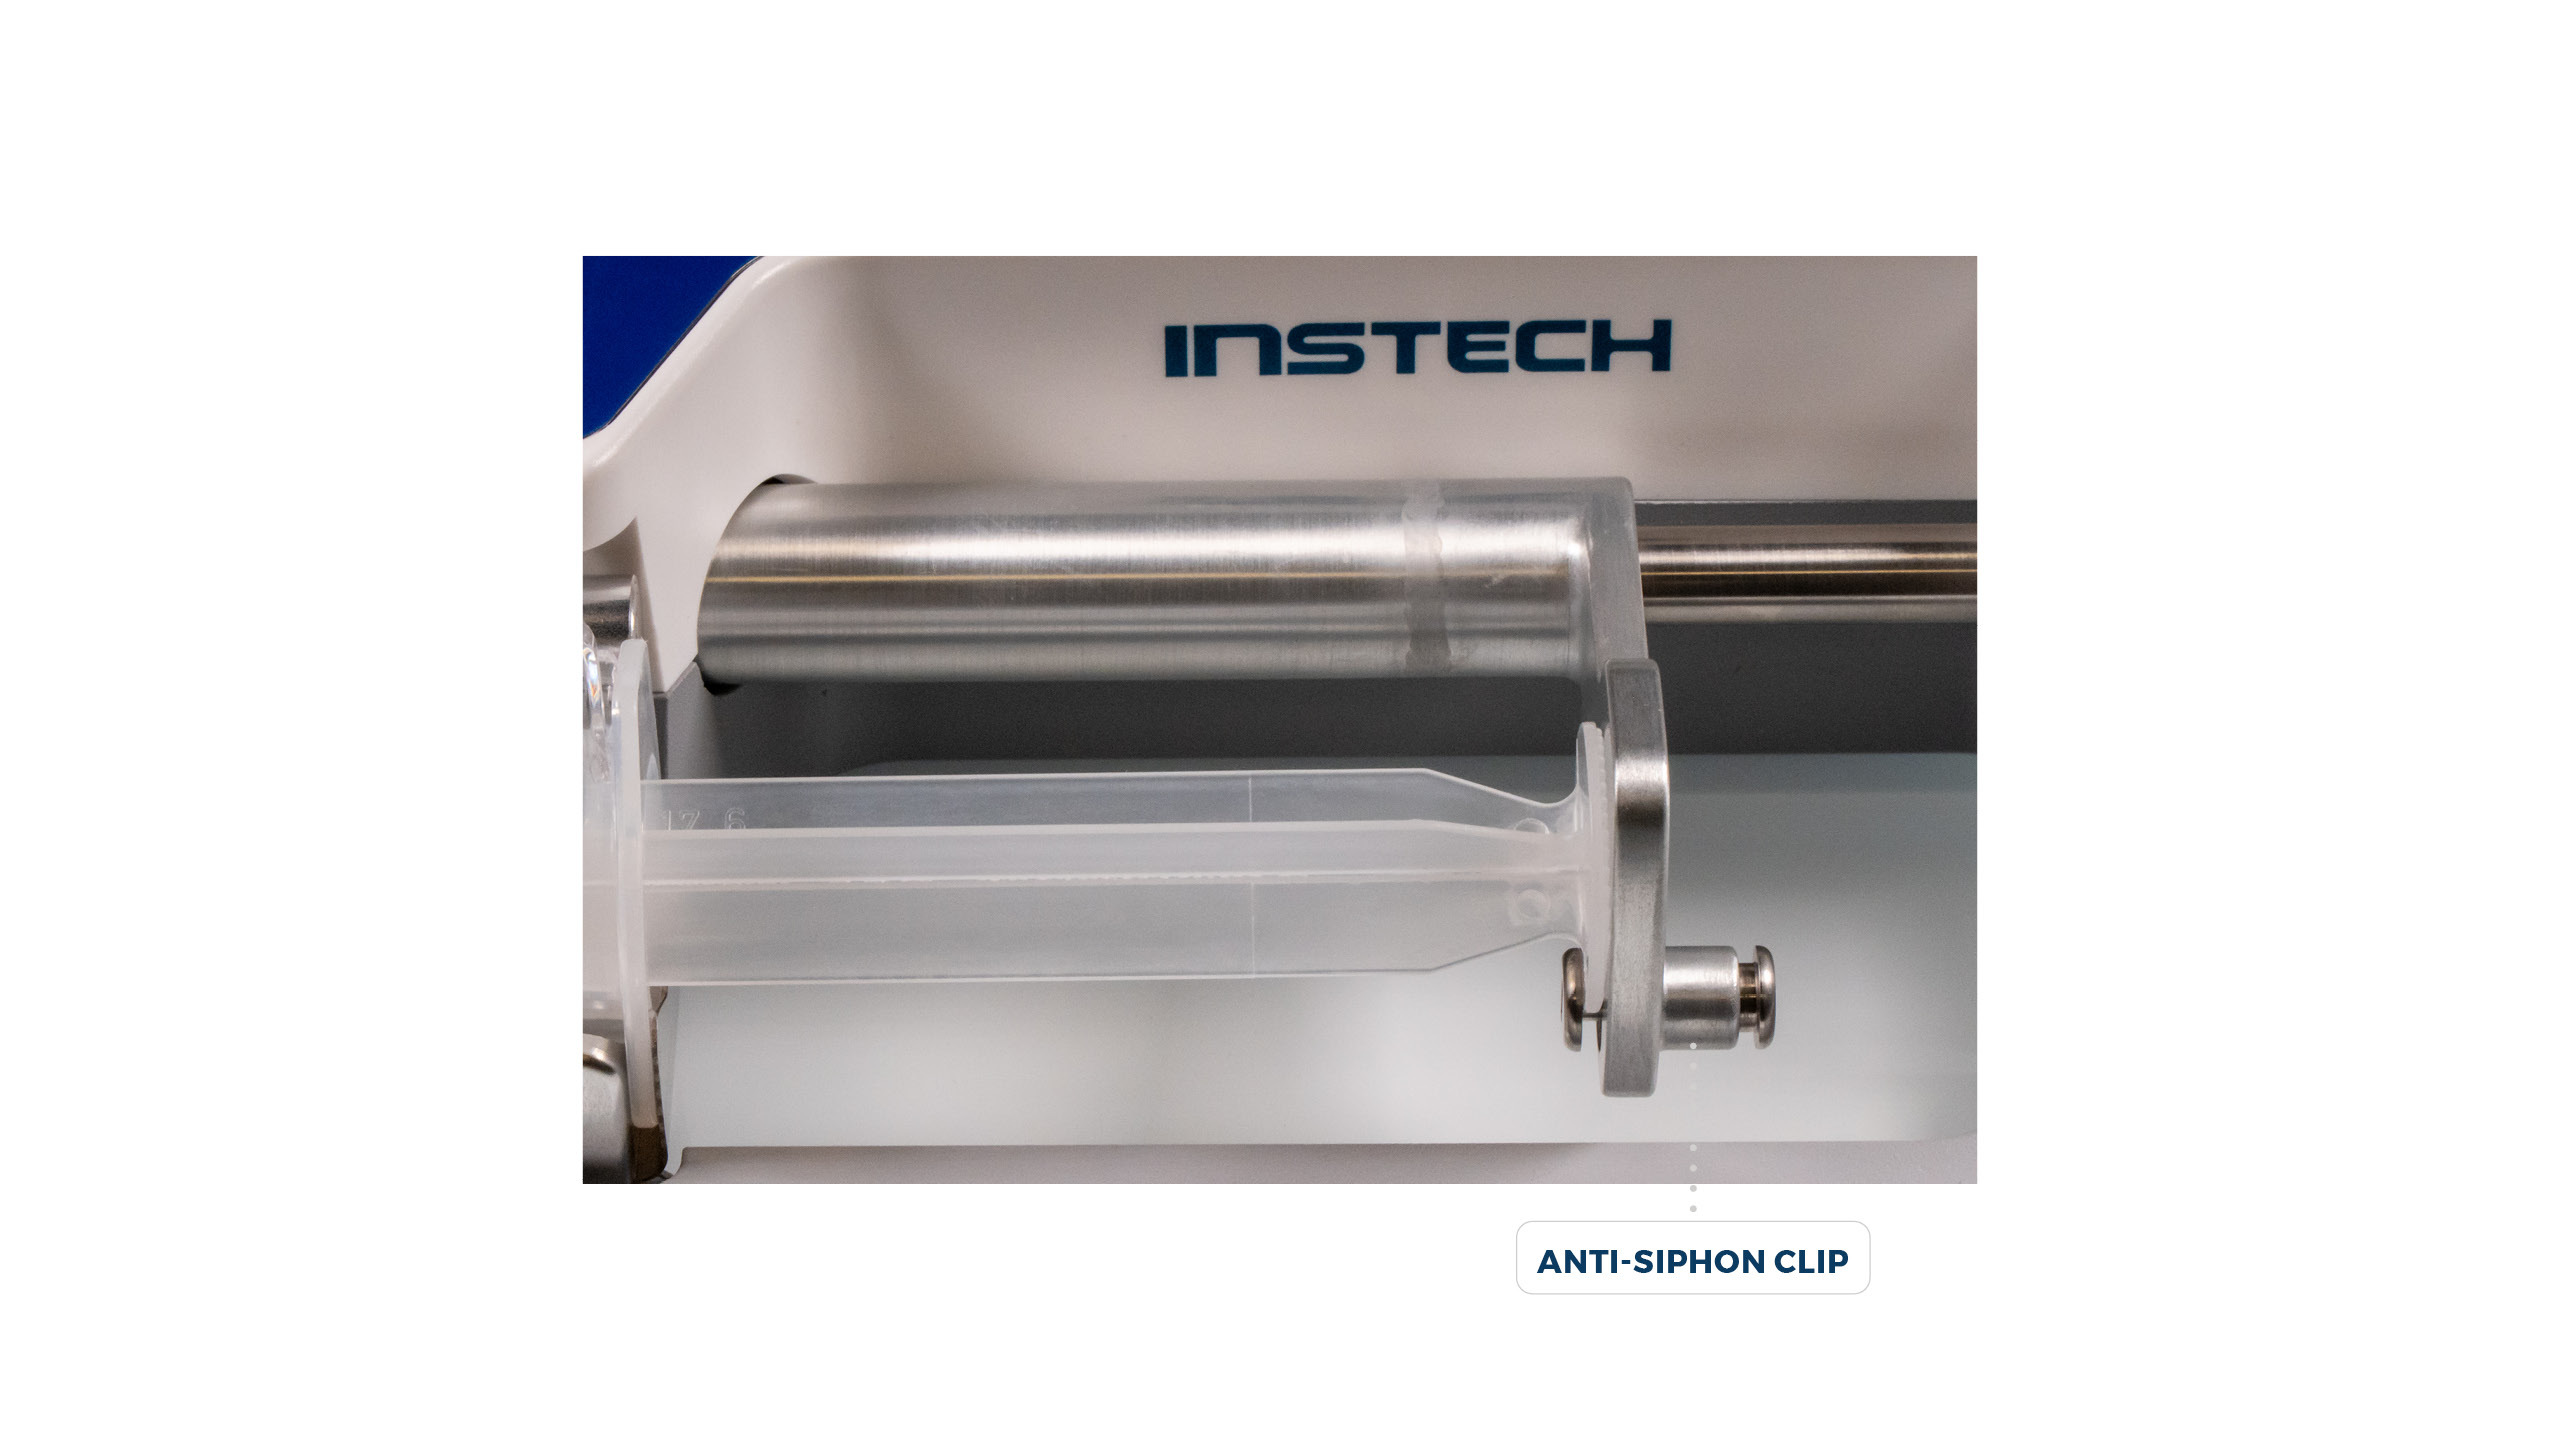
If you are using a large (typically 20mL or larger with BD) or low friction syringe and your output is below the pump it is sometimes possible for gravity to empty your syringe. In these cases, engage the Anti-Siphon clip to hold the plunger as shown. If siphoning is not possible with your setup, do not use the clip.
Priming
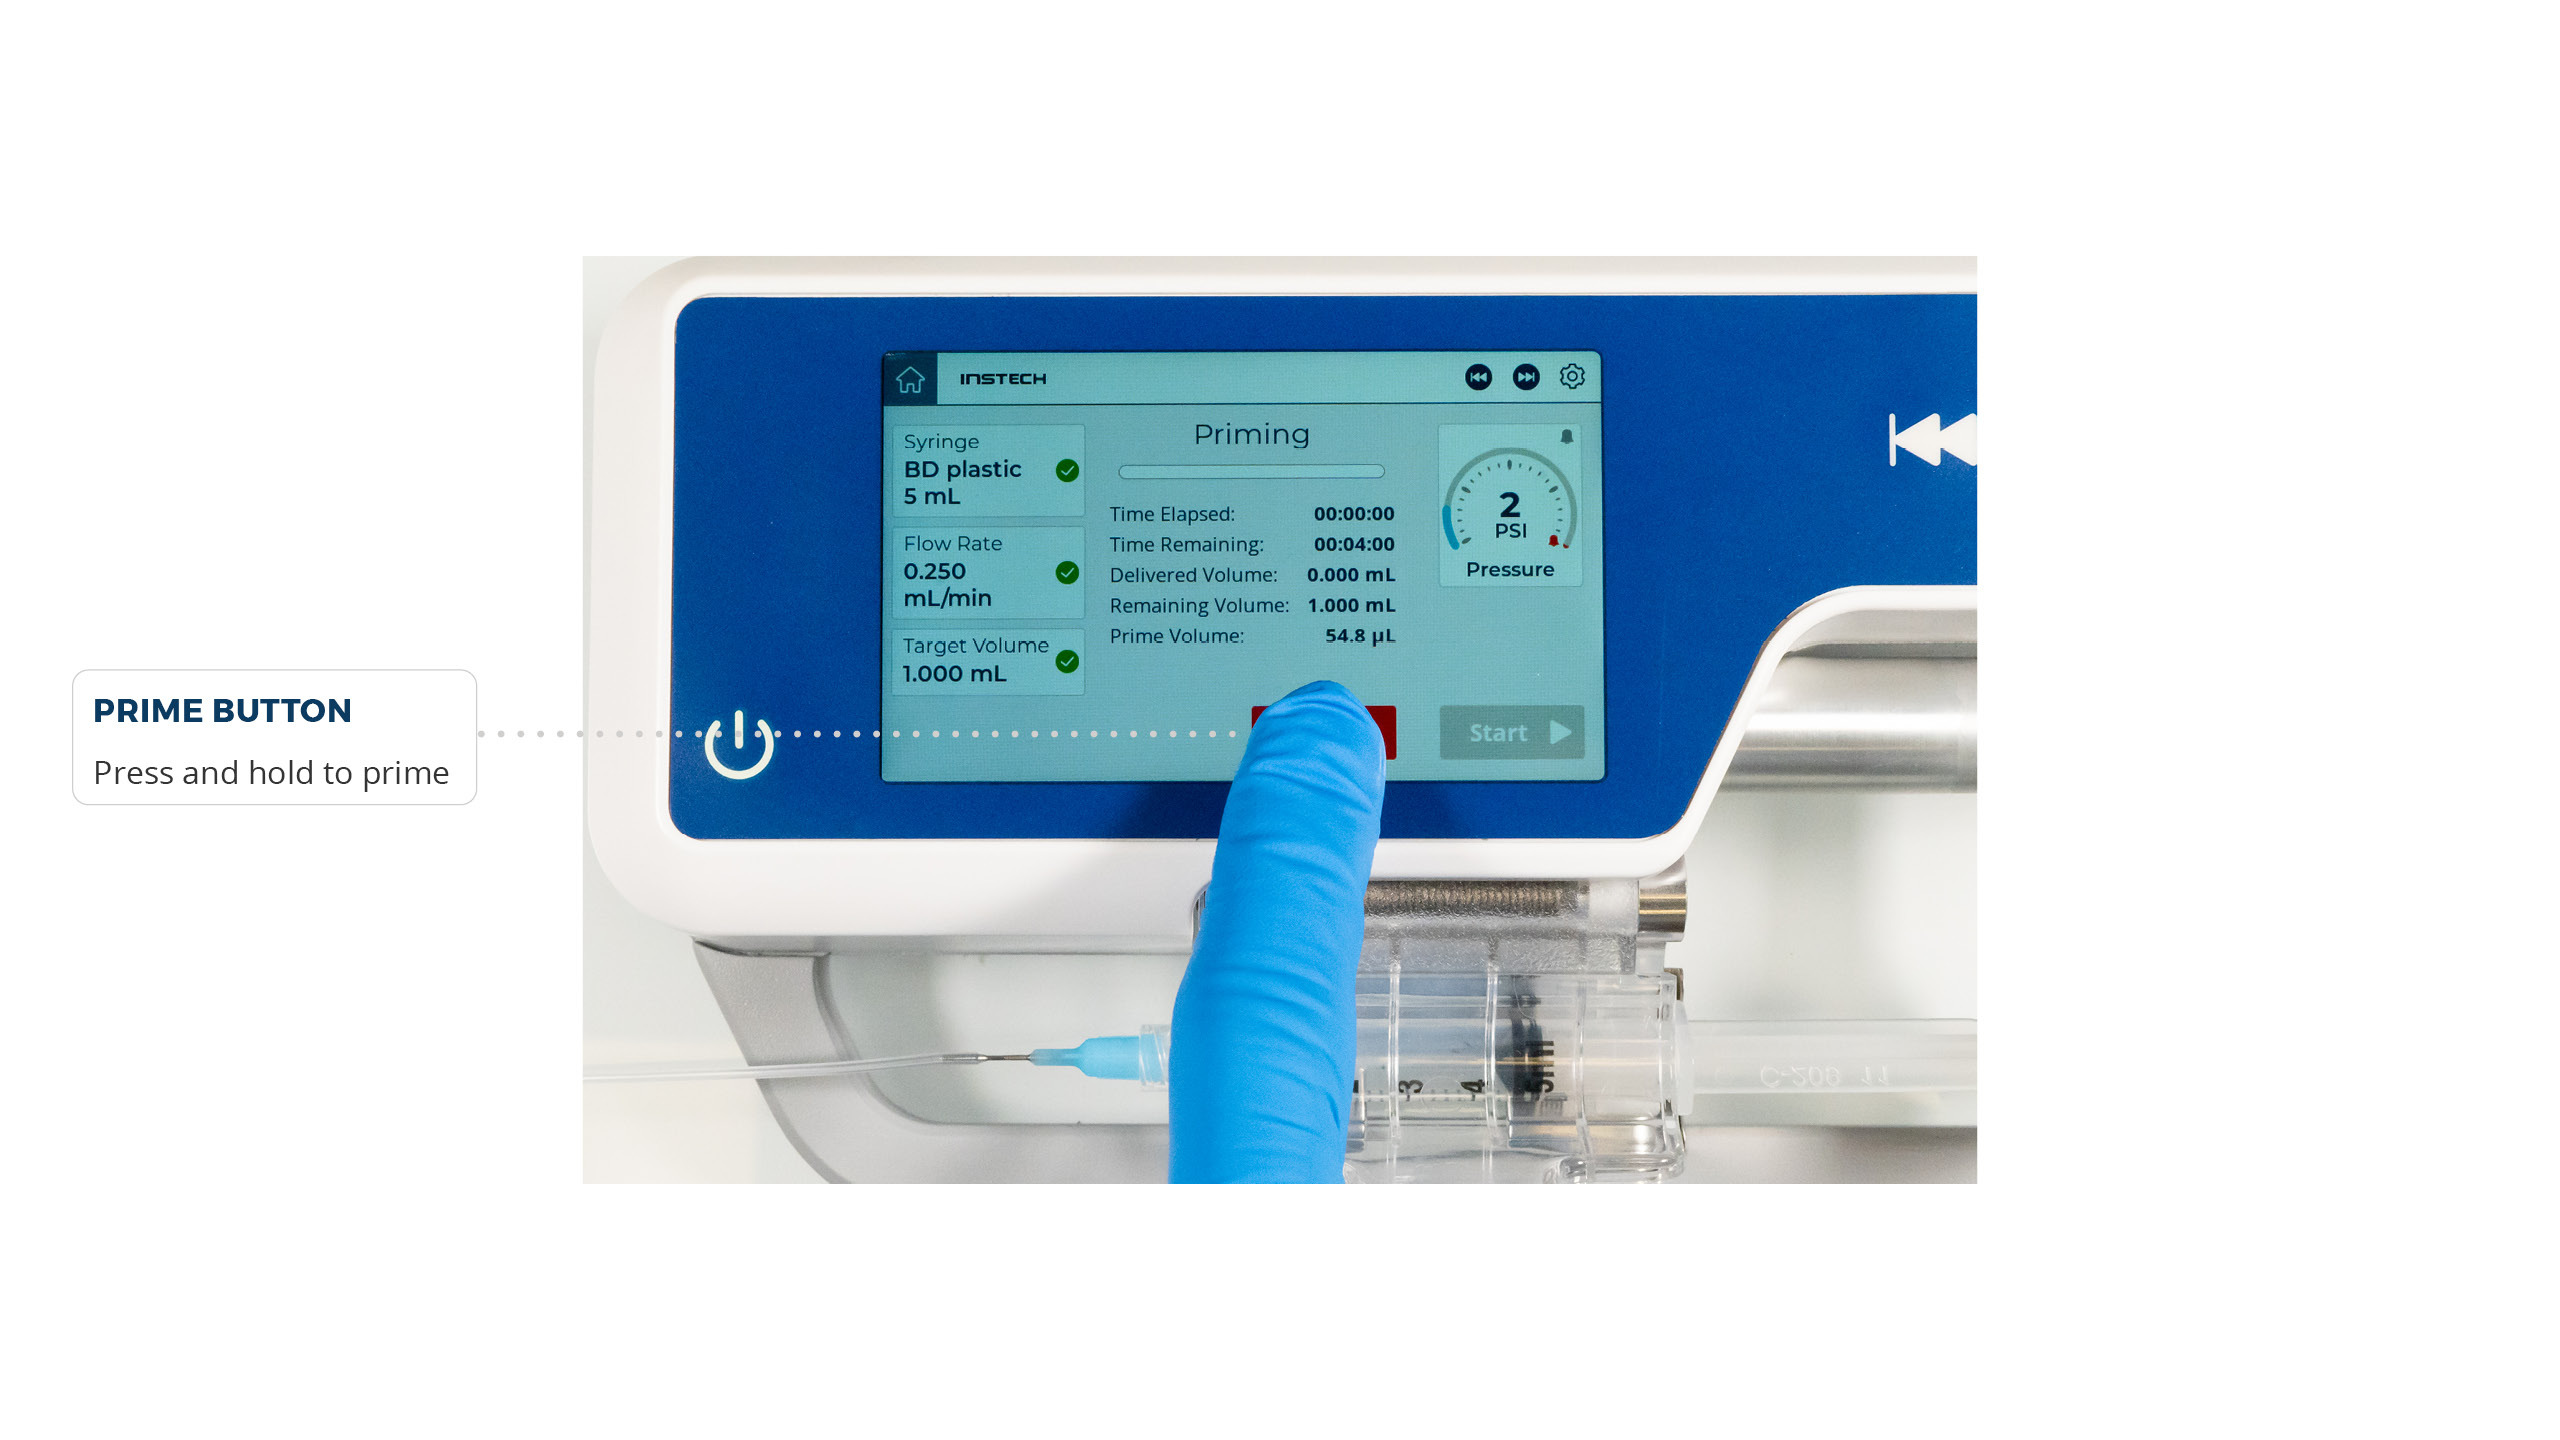
Press the Prime button if you want to fill your IV set using the pump. The pump will run at the Prime Rate (set in the Settings menu) while you hold your finger on the button. Choose a Prime Rate in µL/min that will fill the dead volume of your infusion set in a reasonable time. The Prime Volume will count up on the screen in µL and will not be counted toward Delivered Volume. Priming using the pump is generally preferred to manual priming because it will remove slack in the system in the process, leading to more accurate dose delivery on startup.
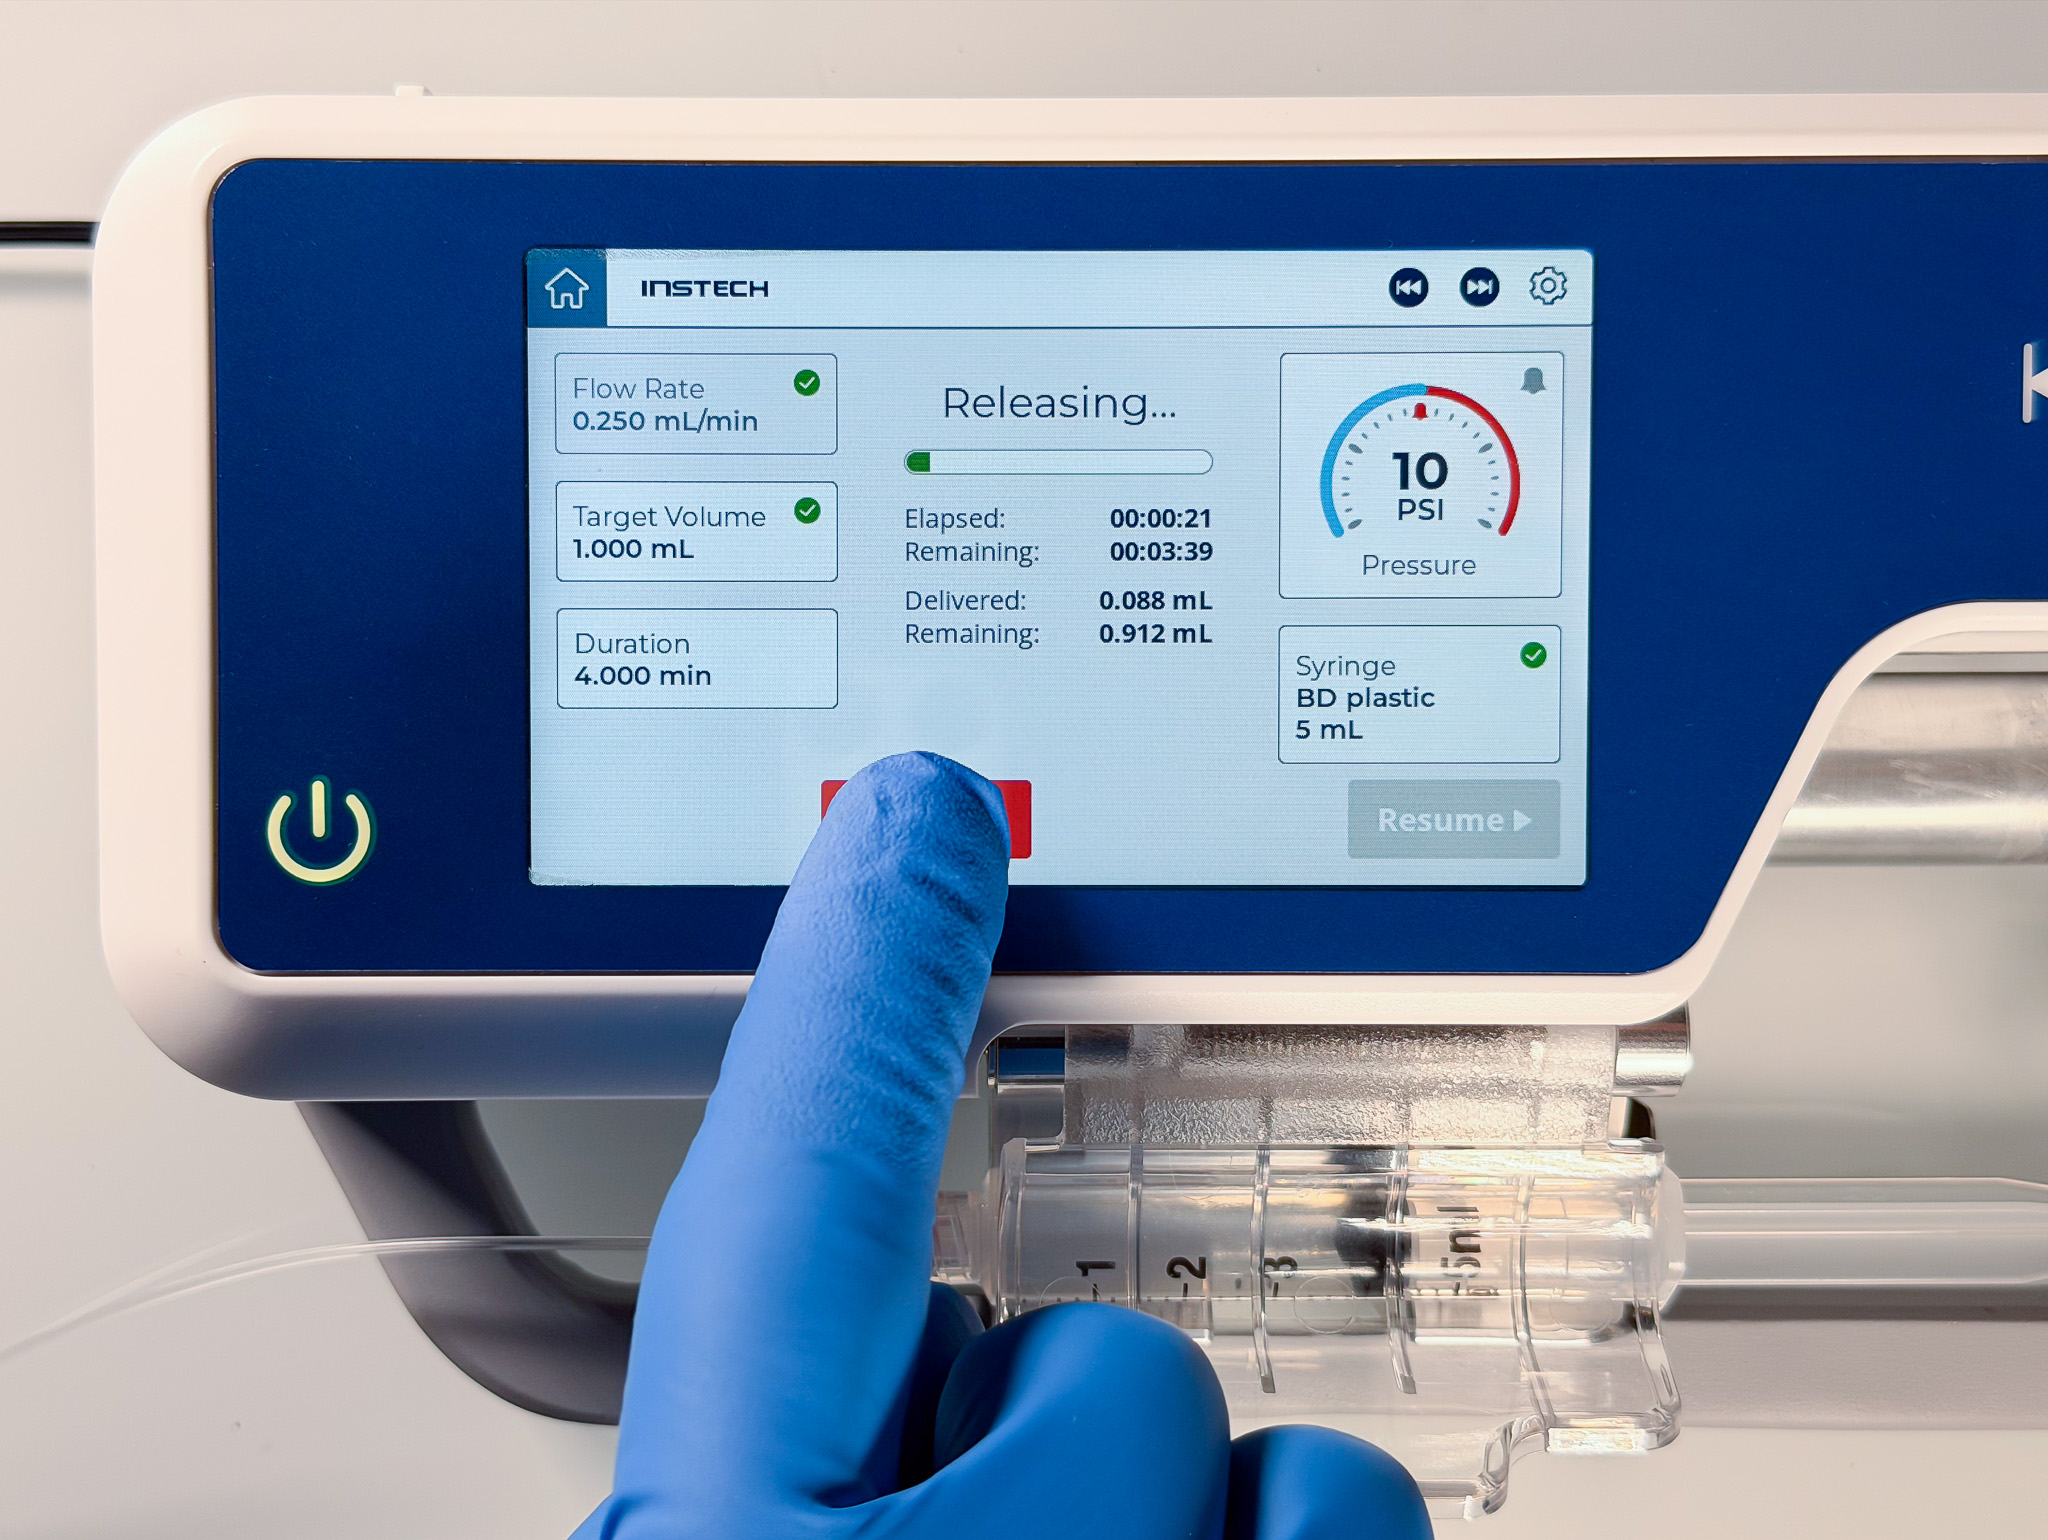
Infusing
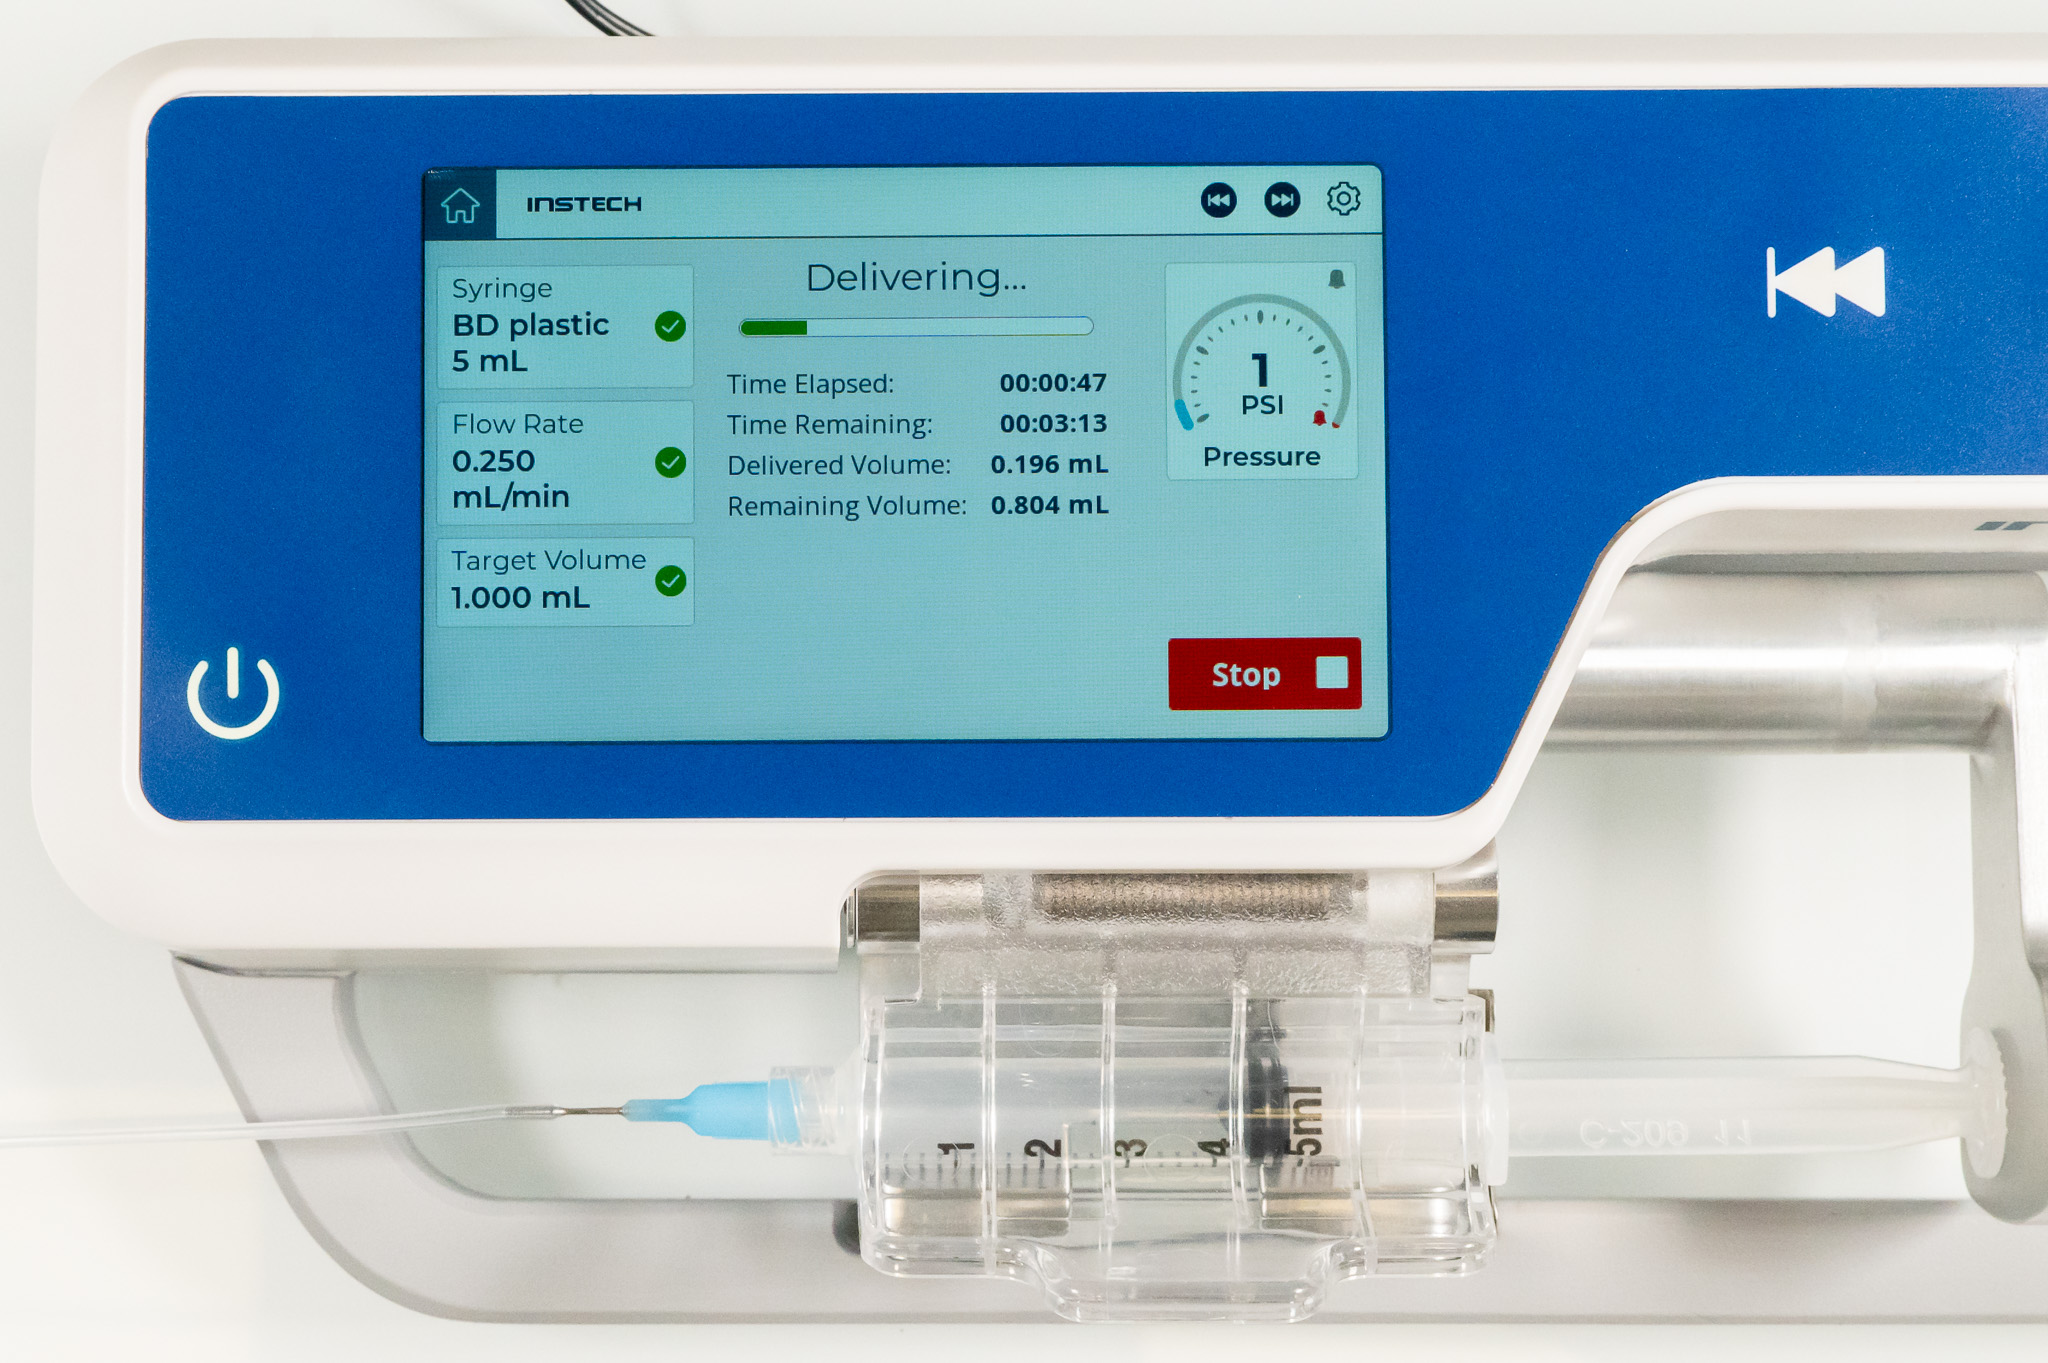
Press Start to begin your infusion. Time and volume, elapsed and remaining, are displayed.
Press either the red Stop button on the screen or the physical stop button if you need to pause in the middle of an infusion. You will be able to Resume where you left off or Cancel to reset time and volume delivered to 0. If you have to disengage the syringe and reengage, you will still be able to Resume so long as you have not changed syringe size.
During infusion, without pausing, you can change the Flow Rate (in {Rate, Volume} mode only) or the Pressure Alarm setting by touching those areas of the screen.
When your target volume has been reached (Delivery Complete), pressing Repeat will deliver the same dose but not reset Delivered Volume (i.e., Delivered Volume will include the previous dose or doses). Pressing Cancel will reset both time and delivered volume.
You can set a Syringe Near Empty warning in minutes from empty in the Settings menu. This message will appear in yellow on the screen, and the status LED light will turn yellow, but the infusion will continue.
Monitoring Pressure and Responding to Occlusions
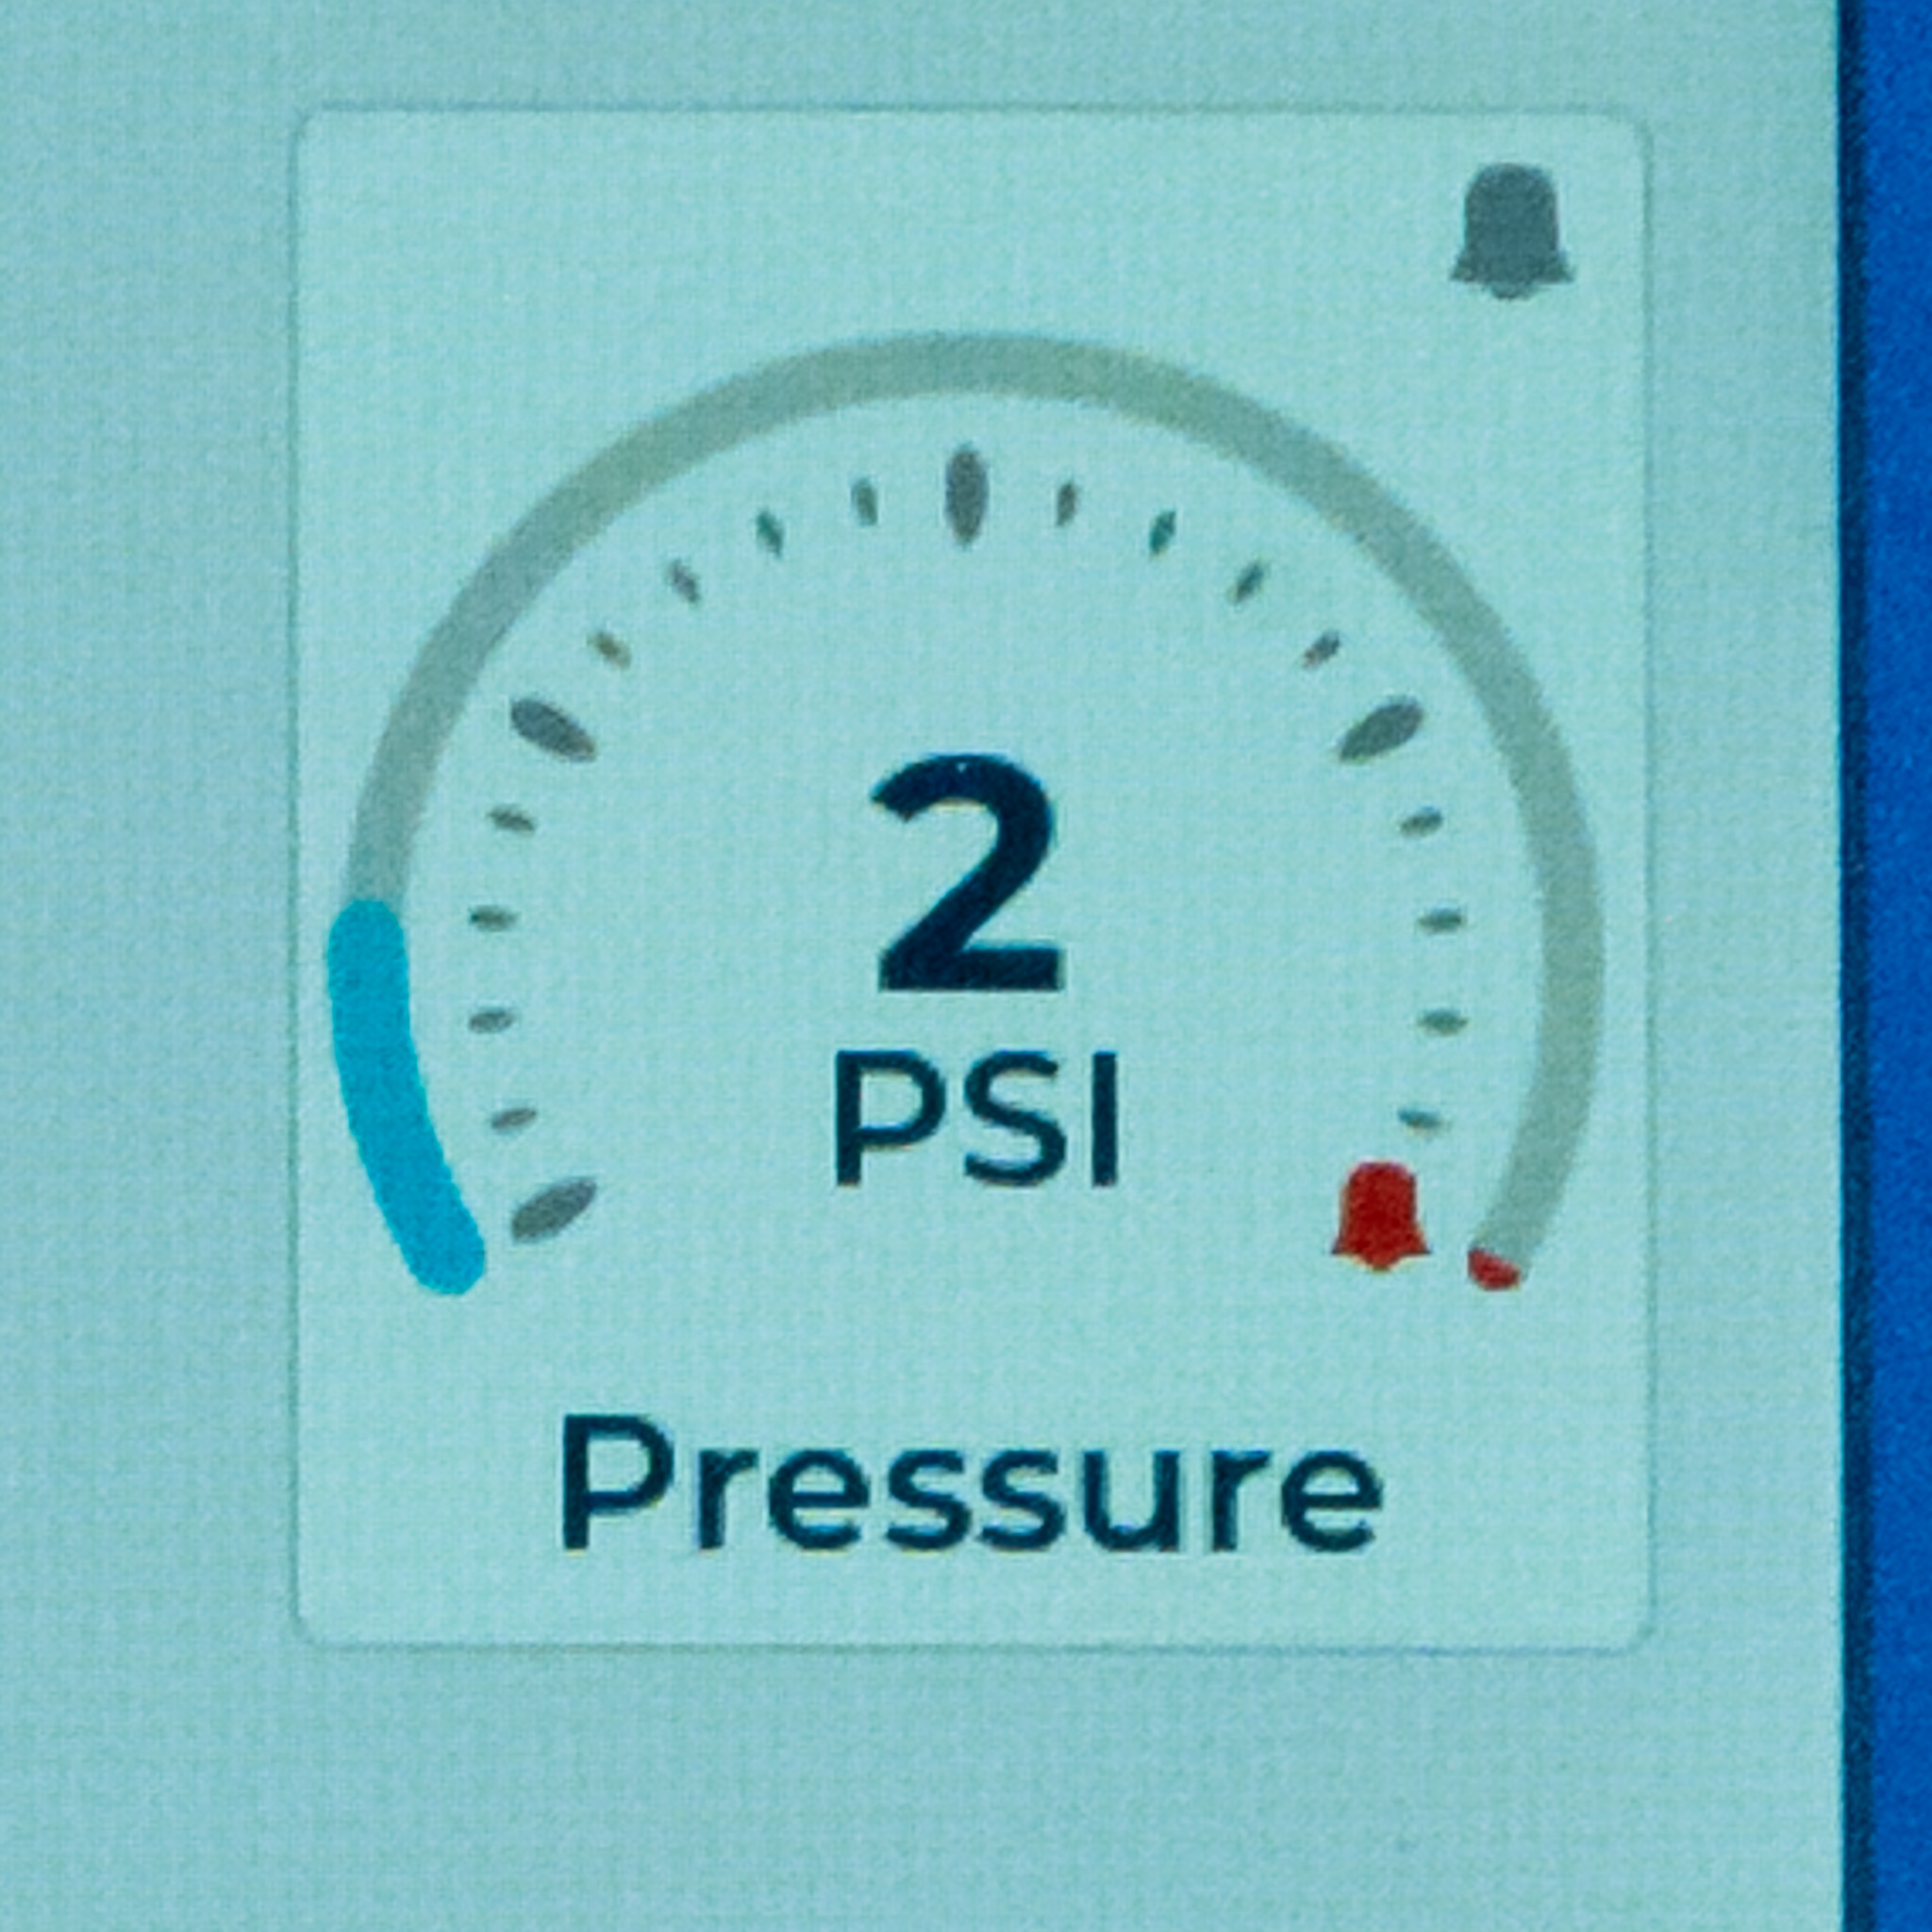
While infusing the pump will display an estimate of the pressure it is sensing in the syringe in PSI (1PSI=50mmHg). If you see the pressure rising you can respond to a potential problem such as a partial or full occlusion without waiting for the pump to alarm.
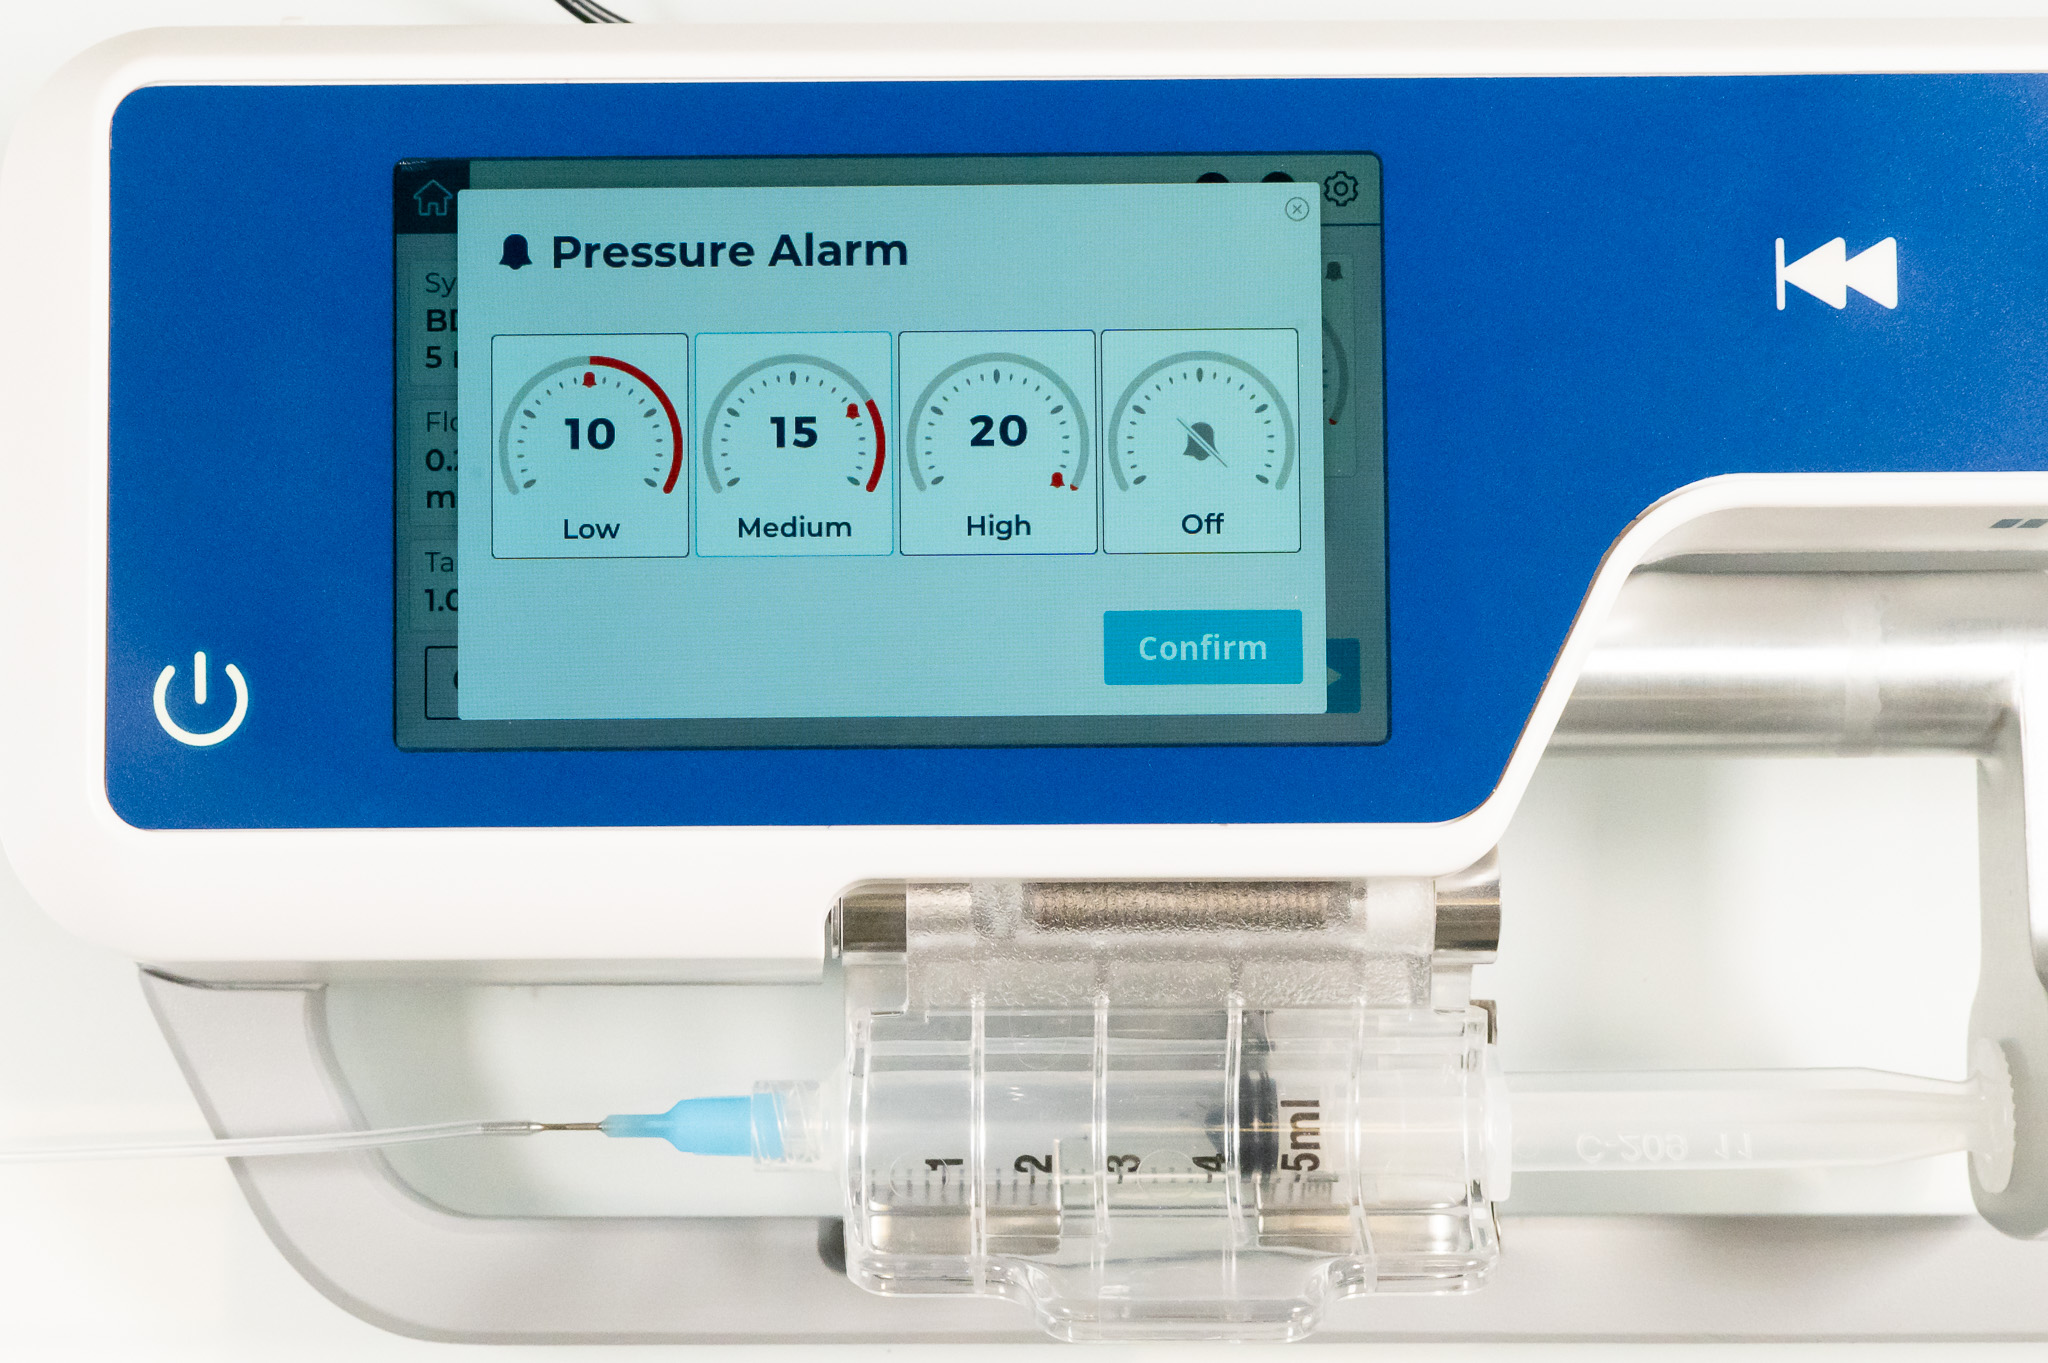
Press on the pressure gauge to set the Pressure Alarm: 10, 15 or 20PSI, or Off. Occlusion alarms are critical for animal safety, to avoid leaks or damage to the infusion set and catheter, and for confidence that the dose was delivered. The 10PSI Low setting will be triggered more quickly than the 15PSI Medium or 20PSI High settings. Syringe friction is included in this reading and friction will be more of a factor with smaller syringes. Choose a higher pressure setting if you are having false alarms; you may find the Medium or High settings more useful with 1mL syringes. Note that syringes, particularly those with rubber plungers, can go bad over time and become difficult to move, and in this case it is better to replace the syringe than to increase the occlusion alarm setting. We do not recommend turning the occlusion alarm off when infusing live animals.
If the pressure alarm is tripped the pump will stop and signal "Occlusion detected." Unless it was a momentary cause, pressure will be built up in the line. Hold the Release button down to move the pusher arm backward slowly and release this pressure. Delivered volume and time elapsed will count backwards as you do this, which will improve dose volume accuracy. Watch the pressure gauge and when it is back to normal levels release the button. The arm will move backward at a rate of approximately 1mm in 10 seconds. From our testing, pressure from most typical occlusions should be released within 5-10 seconds. The arm will stop moving on its own if it senses no pressure. Once the cause of the occlusion has been resolved, press Resume to continue with the infusion. If you have had to change out parts of the infusion set you may use the Prime function prior to Resume.
The pressure sensor and alarm only function with syringes of 1mL and larger. Syringes with very small inner diameters can generate high pressures with only a small amount of force on the plunger, and therefore the pump cannot sense pressure changes accurately when inner diameters are below 4.5mm. In this case the pump will display pump force from 0-100%, where 100% is approximately 18lbs, the full limit of the pump. Take care to monitor your system carefully in cases where high pressures could be dangerous.
Removing the Syringe
To open the pusher arm for a new syringe, press the ![]() button. If Auto-Open is active (as indicated by a blue
button. If Auto-Open is active (as indicated by a blue ![]() icon) a short press of the
icon) a short press of the ![]() button will open the arm completely. Press the physical stop button if you do not want to open completely.
button will open the arm completely. Press the physical stop button if you do not want to open completely.
If the anti-siphon clip is still holding the plunger this could pull blood into the line, so the pump will check for negative pressure and stop with an Aspiration warning; unhook the anti-siphon clip and try again.
If Auto-Open is not active (as indicated by the gray ![]() icon), the arm will only move when you are holding the
icon), the arm will only move when you are holding the ![]() button down.
button down.
Footswitch/Remote Control
Connect a USB footswitch to the USB-A port to operate the pump hands-free. The icon on the Start button will change to a footswitch. Pressing the footswitch will toggle the Start/Stop button. Touchscreen control remains active as well. Alternatively, you may connect a wired or wireless USB mouse in the same way if you need to start and stop the pump from a distance.
Settings
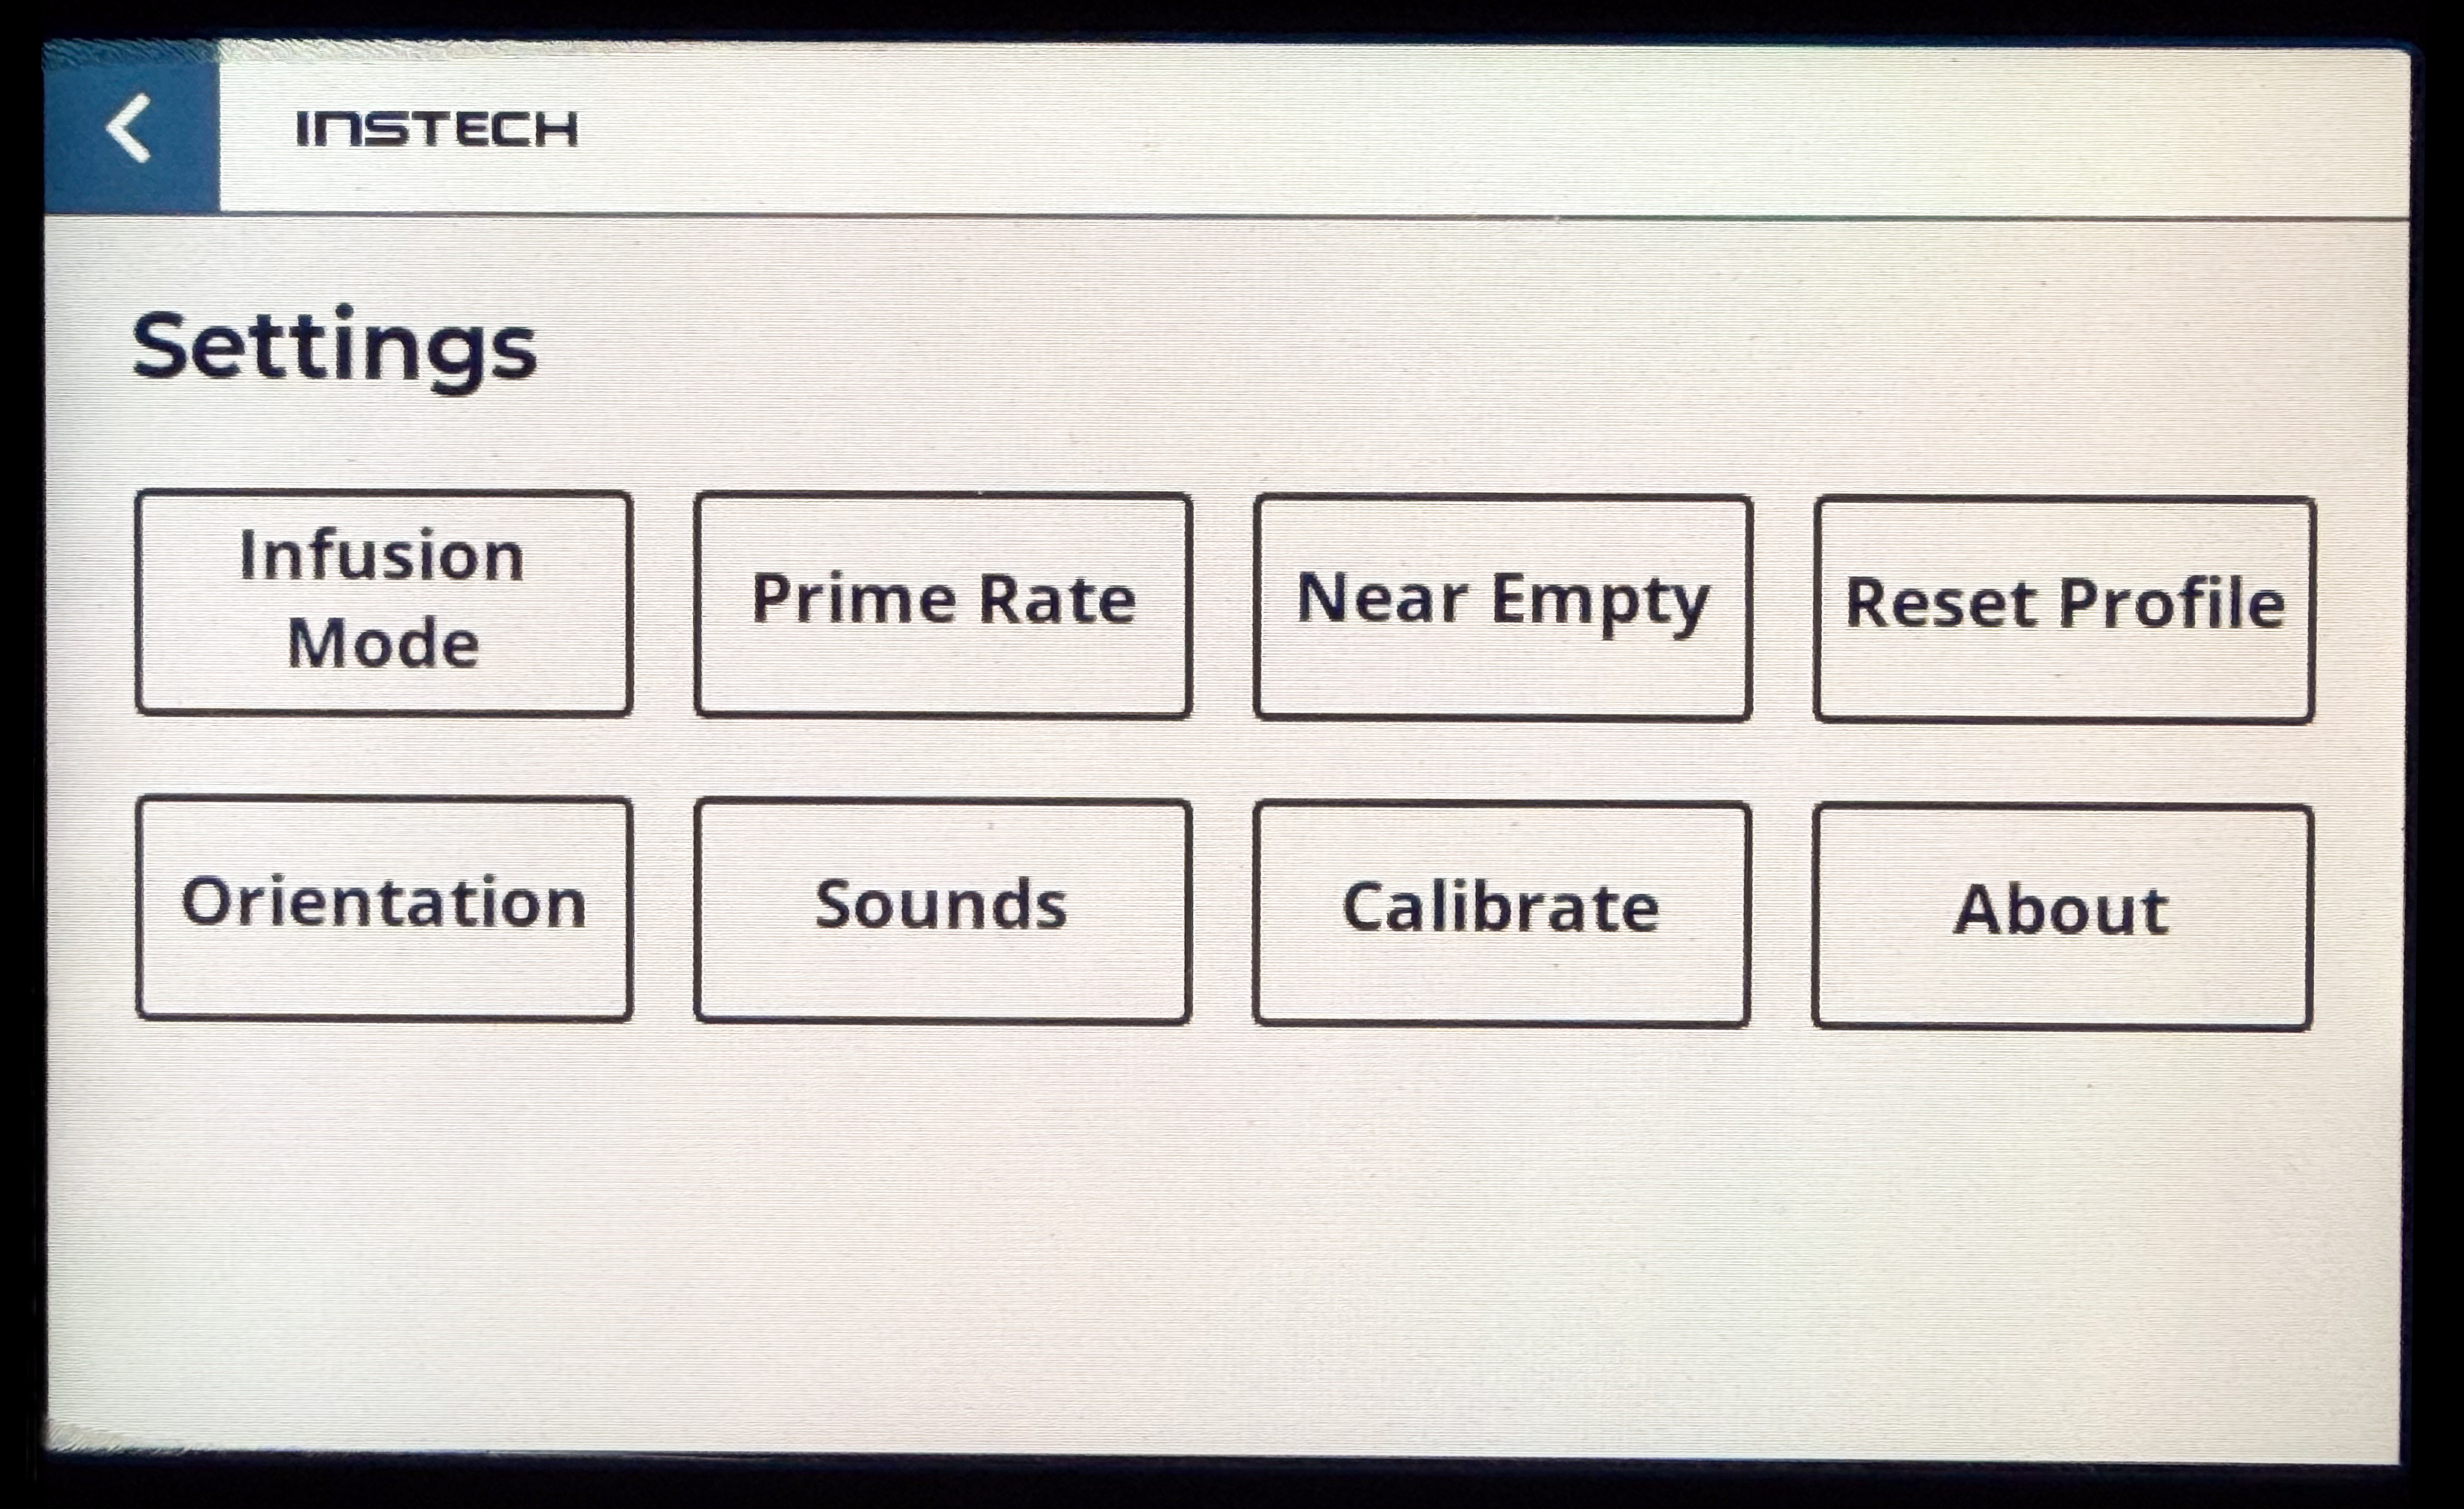
Enter the Settings menu by clicking on the gear in the upper right corner of the main screen.
Infusion Mode
Choose {Rate, Volume}, {Rate, Time} or {Volume, Time}. You will enter these two parameters in the Infusion Profile screen and the pump will calculate the third.
Prime Rate
Sets the rate in µL/min at which the pump will run when the Prime button is held down. See Priming above.
Near Empty
Sets the timing for a "Syringe Near Empty" warning which will appear in yellow and not stop the pump. The units are minutes, based on whatever flow rate is set, before the plunger reaches the end of the syringe. Enter 0 if you do not want to see this warning.
Reset Profile
Clears syringe selection and infusion profile settings. Useful if you are finished using the pump and want the next user to start fresh. The pump will start up in the Syringe Selection menu rather than the main screen, and then move directly to Infusion Profile screen once a syringe is selected.
Orientation
Changes both screen position and expected orientation of the pump relative to the ground for the pump's force sensor. Do not use the Vertical setting unless the pump is oriented vertically with the syringe pointed toward the ground. See Positioning above.
Sounds
Turn on or off audible alarms for pressure, syringe empty and syringe dislodged.
Calibrate
Passcode protected area for calibration and other pump settings. Warning: changing values in this area without proper training and calibration equipment can disable the pump.
About
Displays firmware versions, serial number and last calibration date.
When you are finished in the Settings menu, touch the "<" button in the upper left corner to return to the Home screen.
Maintenance
Updating Firmware
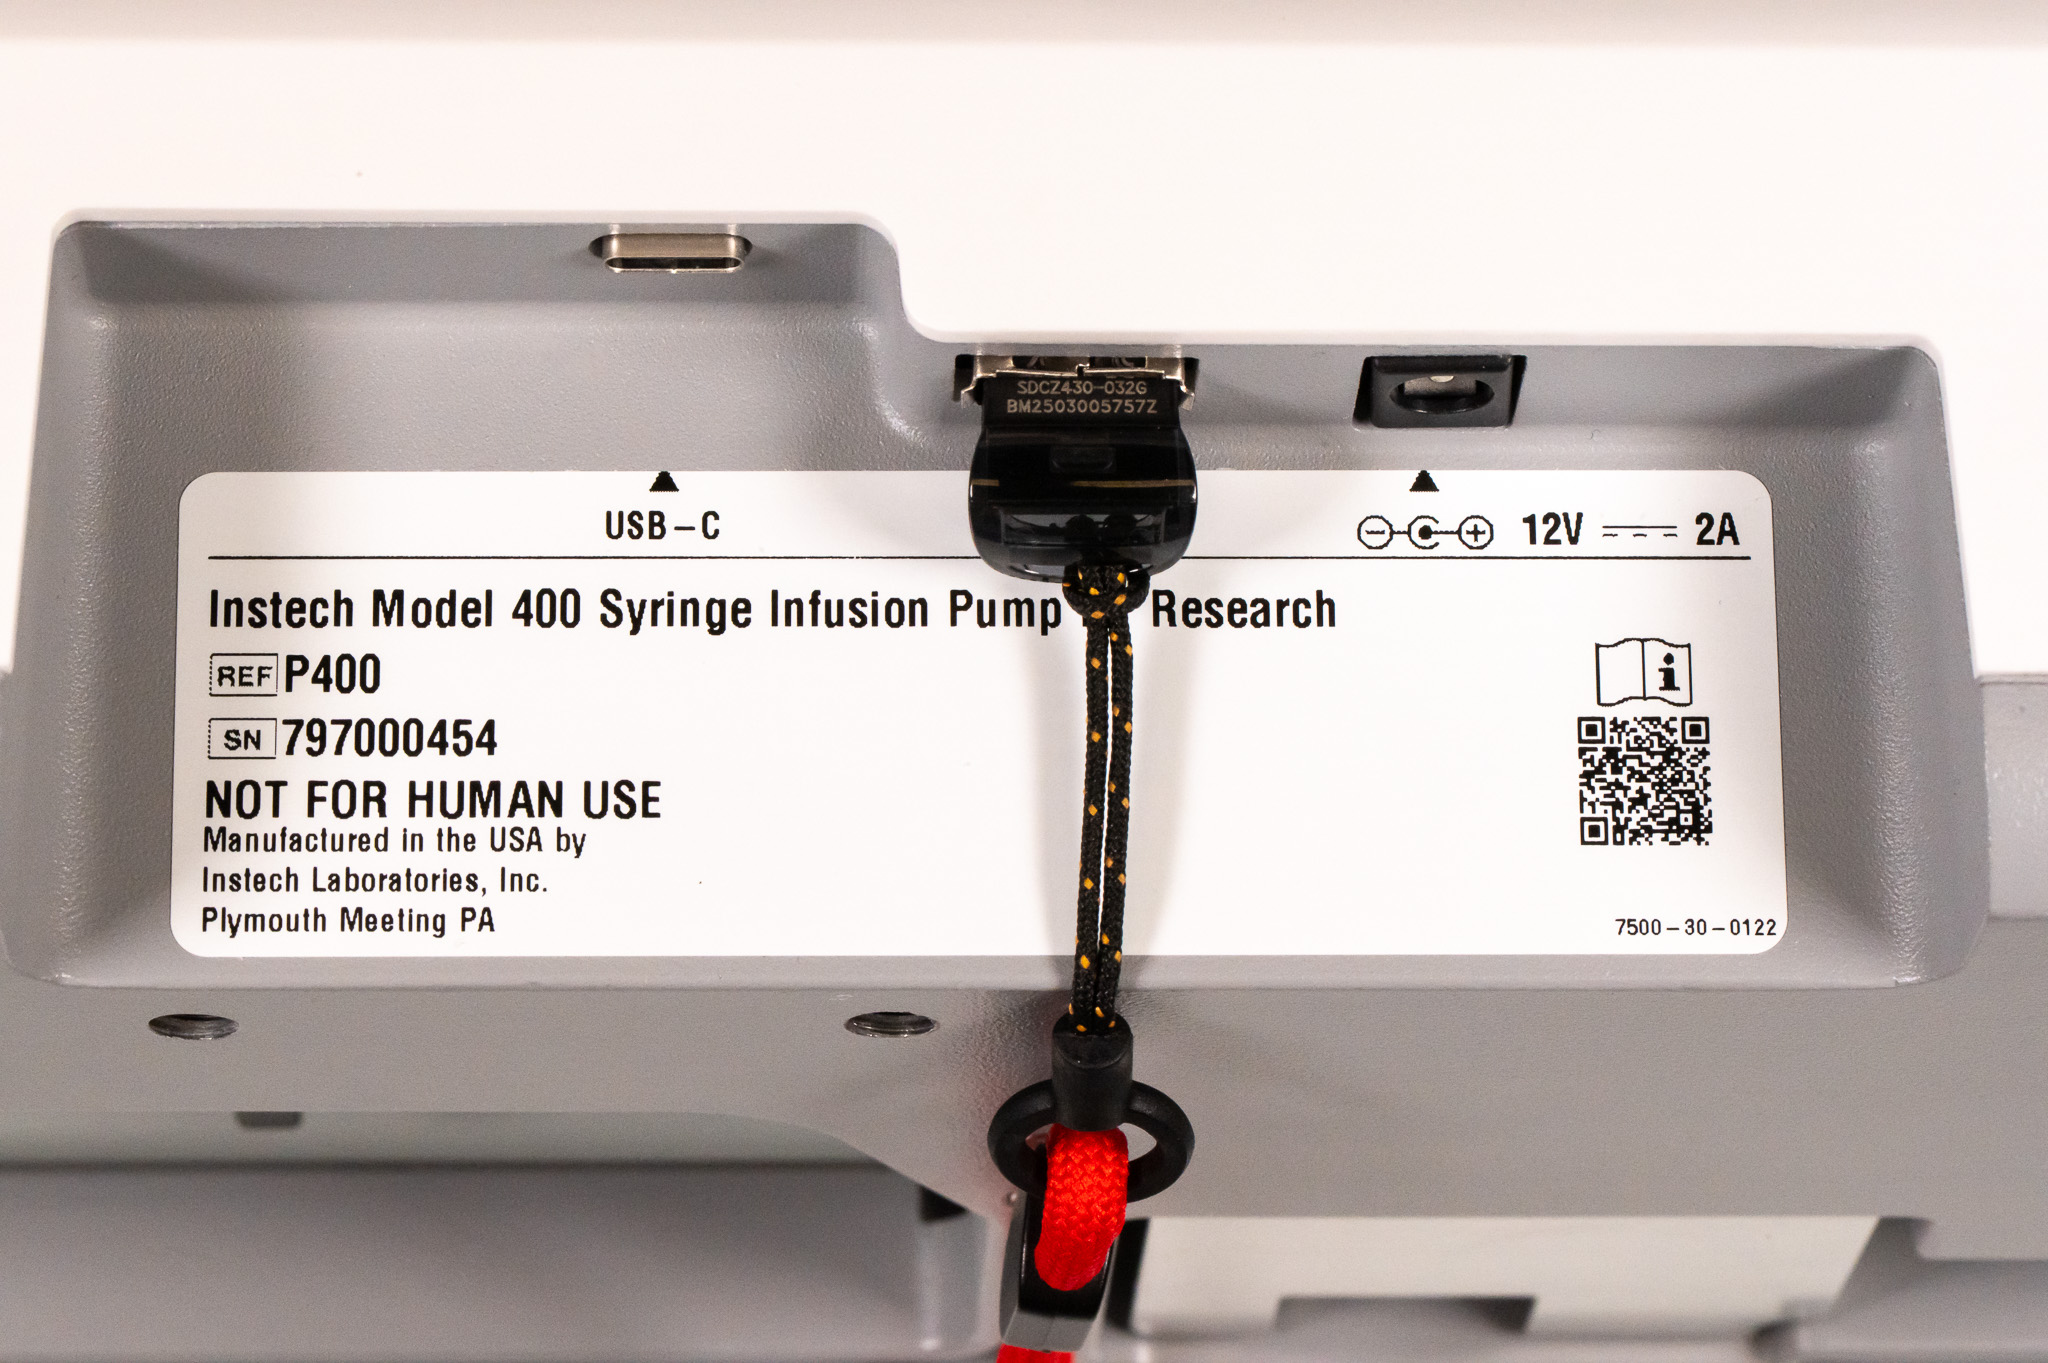
To update pump firmware, download the latest files from the table below, right-click to "Extract All..." from the .zip file and then copy the two files onto a compatible USB drive (SanDisk preferred). The first time you use the drive to update the pump, format it with the FAT32 file system default to clear off any extraneous files. Ensure that the only files on the drive are "ui.bin" and "sys.bin". If downloading files onto a flash drive is not possible at your institution, you may order part no P400/FW from Instech to have a flash drive with the latest files preinstalled shipped to you.
Unplug the pump, place the USB drive into USB-A Update Port, then plug in the pump. Lights will blink and change colors for about 30 seconds. Once the start screen comes up, remove the USB drive. The software versions are displayed on the start screen and in About in the Settings menu.
Firmware Version History
| Version | Release Date | Notes |
|
UI 1.3.0, SYS 1.3.0 |
June 18, 2026 | Inverted Horizonal orientation, USB-A footswitch control, Terumo and Nipro (Japan) syringes, SN on home screen, improved syringe recognition, improved changeover to battery power on power loss, reduce min target volume limit to non-zero, improvements for manufacturability |
| UI 1.2.0, SYS 1.2.0 | February 6, 2026 | Infusion modes (Rate/Vol, Rate/Time, Vol/Time), hide/unhide syringe families from library, UI style updates |
| UI 1.1.3, SYS 1.1.2 | December 10, 2025 | User settable calibration code, ESD protection, bug fixes |
| UI 1.1.0, SYS 1.1.0 | October 31, 2025 | Initial release |
Cleaning
Follow your institution's guidelines for disinfecting and cleaning equipment. The following solutions may be safely used:
- 70% isopropyl alcohol
- 10% bleach solution
- Sporicidin solution
- Cidex solution
- Mild soap and water solution
Do not use strong detergents, organic solvents or solutions containing ammonium chloride on any portion of the pump. Do not immerse. Avoid spills or entry of fluid into the pump housing. Do not autoclave.
Calibration
The pump's accuracy will not change over time, but other sensors, including the force sensor for the pressure monitor and angle sensor for syringe detection, need periodic calibration. Most institutions calibrate annually. The pump may be returned to Instech for calibration (request an RA number before doing so), or if you have qualified personnel at your institution you may purchase a Calibration Kit (part no. P400/CALKIT) and follow the Calibration Procedure to perform calibrations on site. The date of last calibration is displayed on the start up screen and in About under Settings.
Safety
- For research use only; not for human use.
- For indoor use only. Do not use in wet locations.
- Altitude limit 2000m.
- Temperature limits 5°C - 40°C.
- Relative humidity limits 15% - 95% non-condensing.
Troubleshooting
| Problem | Possible Cause | Solution |
| The pump did not automatically recognize my syringe even though it is in the library. |
|
|
| I cannot start infusing because the Start button is gray. |
|
|
| The pusher arm stopped before it touched the syringe during Auto-Close. |
|
|
| The pump gave me an "Aspiration warning." |
|
|
| The pump triggers an occlusion alarm while priming, but my set is not occluded. |
|
|
| The pump will not start up with a power source plugged into the USB-C port. |
|
|
| The pump will not start up with a USB PD3.0 battery connected to the USB-C port. |
|
|
| The pump will not connect to my computer with a USB-C cable. |
|
|
Instech Laboratories, Inc.
450 South Gravers Road
Plymouth Meeting PA 19462 USA
+1 (610) 941-0132
www.instechlabs.com